数据结构入门指南(C语言版) (图片来源于《计算机是怎么跑起来的》一书和GeeksforGeeks网站)
初识数据结构 1.数组 数组是数据结构的基础。
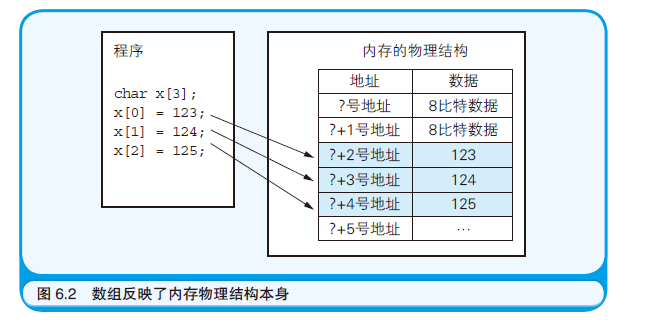
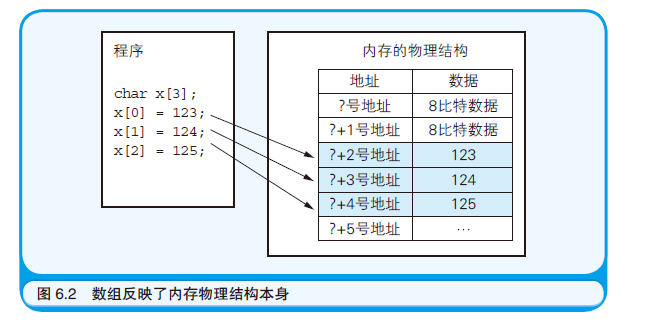
数组在程序中往往是从内存整体中分配出一块连续的空间,数组反映了内存的物理结构
2.数组的应用 以数组为基础的数据结构,可供各种各样的算法处理大量数据
3.数据结构概念 内存的物理结构无法改变,而数据结构可以通过程序在逻辑上改变内存的物理结构,使数据按照自己的相反分布
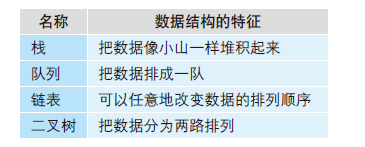
典型的数据结构如下:
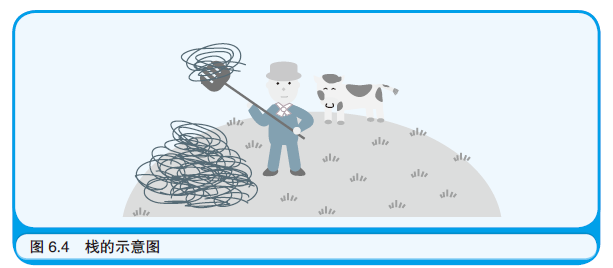
栈的实现方法(stack) 1.栈的特点 栈中数据的使用顺序和堆积顺序是相反的,堆积顺序是从下到上,而使用顺序是从上到上,就好像干草堆一样
这种数据存取方式称为LIFO(last in first out,后进先出),即最后存入的数据最先被处理
2.栈的实现 1 2 3 4 5 6 7 8 9 10 11 12 13 14 15 16 17 18 19 20 21 22 23 24 25 26 27 28 29 30 31 32 33 34 35 36 37 38 39 40 #include <stdio.h> char Stack[100 ];char StackPointer = 0 ; void Push (char Data) Stack[StackPointer] = Data; StackPointer++; } char Pop () StackPointer--; return Stack[StackPointer]; } int main () Push(1 ); Push(2 ); Push(3 ); Push(4 ); while (StackPointer !=0 ) { char result = Pop(); printf ("%d\n" ,result); } }
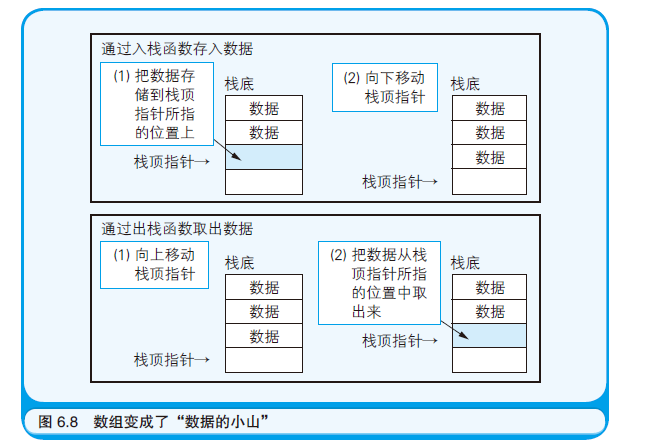
3.原理图
注意此图的栈底放在上面,最底部才是栈顶
4.语法解释
最终实现效果是:存入顺序是1,2,3,4;取出顺序是4,3,2,1
栈的成分:数组,栈顶指针,入栈函数,出栈函数
入栈函数将数据压入栈中
出栈函数将数据从栈中弹出
存储5个数据,最后栈顶指针指向5的地址(地址4为最后一个数据),所以在出栈函数中,栈顶指针需要减1,才能取得第一个数据
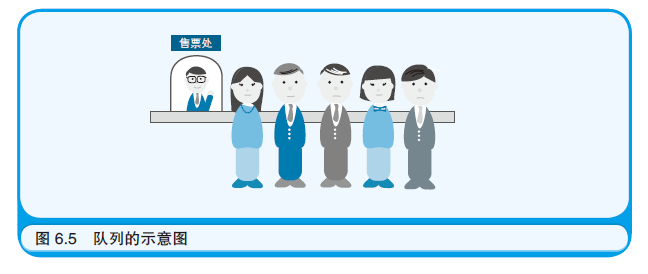
队列的实现方法(queue) 1.队列的特点 队列中最先存入的数据是被最先处理的,这种方式被称为FIFO(first in first out, 先进先出)。就像排队上车一样,先到的人就能先上车
2.队列的实现 1 2 3 4 5 6 7 8 9 10 11 12 13 14 15 16 17 18 19 20 21 22 23 24 25 26 27 28 29 30 31 32 33 34 35 36 37 38 39 40 41 42 43 44 45 46 47 48 49 50 51 52 53 54 55 56 57 58 59 #include <stdio.h> char Queue[100 ];char SetIndex = 0 ;char GetIndex = 0 ; void Set (char Data) Queue [SetIndex] = Data; SetIndex++; if (SetIndex>=100 ){ SetIndex = 0 ; } } char Get () char Data; Data = Queue[GetIndex]; GetIndex++; if (GetIndex>=100 ){ GetIndex = 0 ; } return Data; } int main () Set(1 ); Set(2 ); Set(3 ); Set(4 ); while (GetIndex != SetIndex) { char result = Get(); printf ("%d\n" ,result); } }
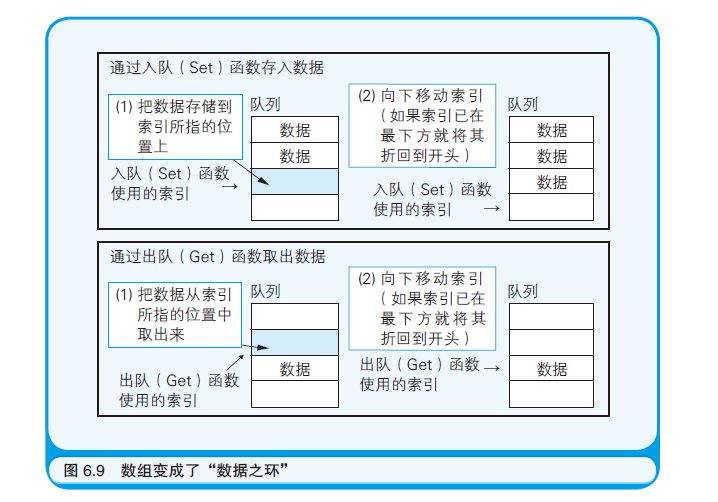
3.原理图
4.语法解释
最终实现效果是:存入顺序是1,2,3,4;取出顺序是1,2,3,4
栈的成分:数组,数据存储指针,数据读取指针,存储函数,读取函数
队列的逻辑结构实际上是圆环,数据存满后又会回到开头开始存数据
数据读取指针和数据存储指针是一样的,走向一样,最终值(指存完数据和读完数据的最后值的值)也要相等
结构体 1.组成 结构体即把若干个数据项汇集到一起并赋予其名字的一个整体
定义完结构体后,我们可以把结构体当作一个数据类型,可以用它来声明变量
每一个被汇集到结构体的每一个数据项叫做结构体的成员
2.运用 我们需要用到结构体数组来实现链表和二叉树
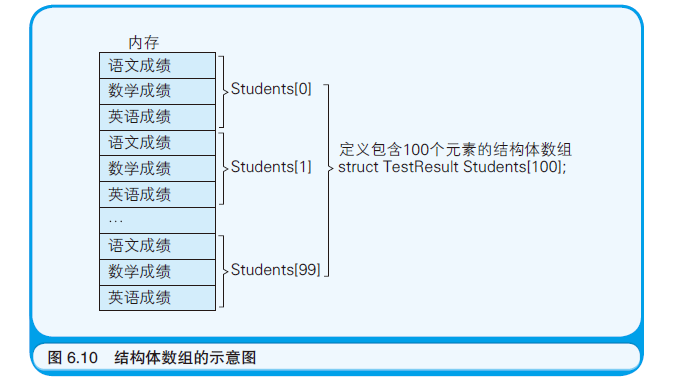
3.内存分布
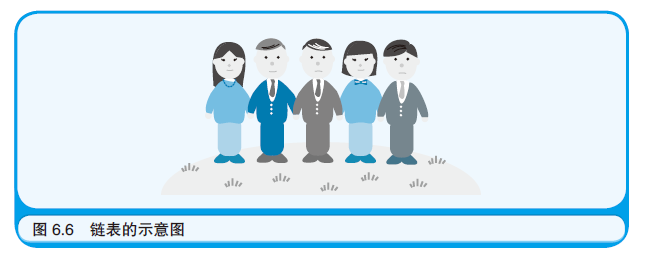
链表的实现方法(Linked list) 1.链表的特点 链表容易实现数据的插入和删除,任意改变数据的排列方式。就像人手拉手排成一排,要改变顺序,只需要改变牵手对象即可实现
2.链表的实现 参考文章:https://www.geeksforgeeks.org/linked-list-set-1-introduction/等系列文章
1 2 3 4 5 6 7 8 9 10 11 12 13 14 15 16 17 18 19 20 21 22 23 24 25 26 27 28 29 30 31 32 33 34 35 36 37 38 39 40 41 42 43 44 45 46 47 48 49 50 51 52 53 54 55 56 57 58 59 60 61 62 63 64 65 66 67 68 69 70 71 72 73 74 75 76 77 78 79 80 81 82 83 84 85 86 87 88 89 90 91 92 93 94 95 96 97 98 99 100 101 102 103 104 105 106 107 108 109 110 111 112 113 114 115 116 117 118 119 120 121 122 123 124 125 126 127 128 129 130 131 132 133 134 135 136 137 138 139 140 141 142 143 144 145 146 147 148 149 150 151 152 153 154 155 156 157 158 159 160 161 162 163 164 165 166 167 168 169 170 171 172 173 174 175 176 177 178 179 180 181 182 183 184 185 186 187 188 #include <stdio.h> #include <stdlib.h> void printList (struct Node* n) void insertAfter (struct Node* prev_node, int new_data) void push (struct Node** head_ref, int new_data) void append (struct Node**head_ref, int new_data) void deleteNode (struct Node**head, int key) struct Node { int data; struct Node * next ; }; int main () struct Node * head =NULL ; struct Node * second =NULL ; struct Node * third =NULL ; head = (struct Node*)malloc (sizeof (struct Node)); second = (struct Node*)malloc (sizeof (struct Node)); third = (struct Node*)malloc (sizeof (struct Node)); head -> data = 1 ; head -> next = second; second -> data = 2 ; second -> next = third; third -> data = 3 ; third -> next = NULL ; append(&head,6 ); push(&head,7 ); insertAfter(head->next,8 ); deleteNode(&head, 2 ); printList(head); return 0 ; } void printList (struct Node* n) while (n != NULL ){ printf ("%d\n" , n->data); n = n->next; } } void push (struct Node** head_ref, int new_data) struct Node * new_node =malloc (sizeof (struct Node)); new_node->data = new_data; new_node->next = (*head_ref); (*head_ref) = new_node; } void insertAfter (struct Node* prev_node, int new_data) if (prev_node==NULL ){ printf ("error" ); return ; } struct Node * new_node =malloc (sizeof (struct Node)); new_node->data = new_data; new_node->next = prev_node->next; prev_node->next = new_node; } void append (struct Node**head_ref, int new_data) struct Node * new_node =malloc (sizeof (struct Node)); struct Node *last = new_node->data = new_data; new_node->next = NULL ; if (*head_ref == NULL ){ *head_ref = new_node; return ; } while (last->next != NULL ){ last = last->next; } last->next = new_node; return ; } void deleteNode (struct Node**head_ref, int key) struct Node *temp = if (temp != NULL && temp->data == key){ *head_ref = temp->next; free (temp); return ; } while (temp != NULL && temp->data !=key){ prev = temp; temp = temp->next; } if (temp == NULL ){ return ; } prev->next = temp->next; free (temp); }
3.原理图 (1)链表结构图
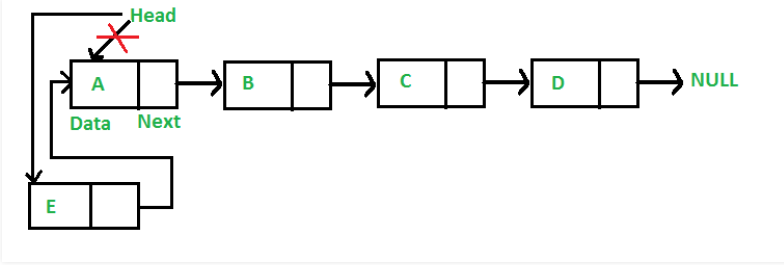
(2)头部插入示意图
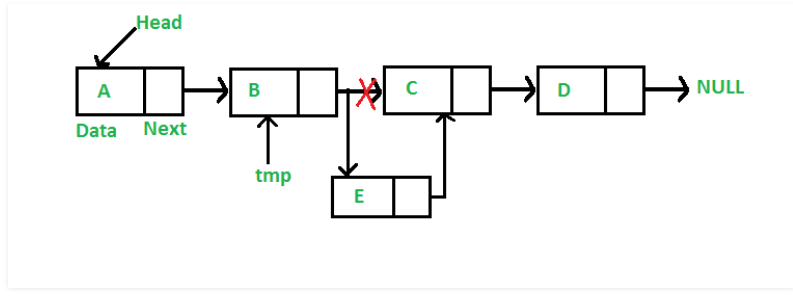
(3)指定位置插入示意图
(4)末端插入示意图
(5)删除示意图
4.语法解释
struct Node* next声明后,next存储地址,*next是地址中的值(自我引用结构体)
声明节点中,struct Node* head = NULL,则head内为地址
malloc()函数的声明方法为:void *malloc(size_t size),其作用是分配所需的内存空间,返回值即为指向被分配内存的指针(地址)
则有head,second,third存储的是指向该节点的指针(地址),要使指向该节点的指针访问到节点的成员,那就用->运算符
struct Node** head_ref相当于指向该结构体的指针的指针,即该指针存放的位置,相当于head(头部指针)取址即&head;* head_ref则为该结构的指针(即head,但是*head_ref这种方式才能动态移动指针)
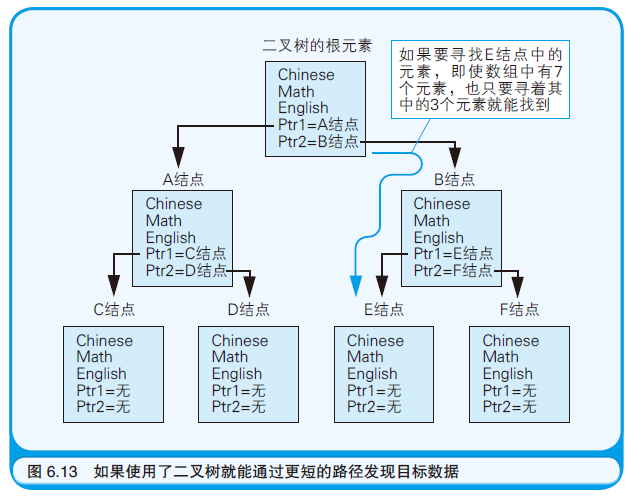
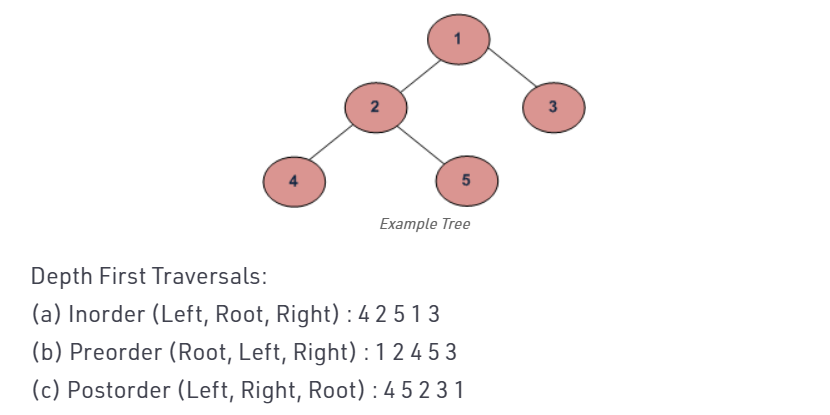
二叉树的实现方法(Binary tree) 1.二叉树的特点 二叉树是基于链表的,用到的还是自我引用的结构体,但是会带有两个连接信息(即指向其他元素的指针)
二叉树多用于实现用于搜索数据的算法(如:二分查找法)
二叉树结构在搜索数据时,不是沿着一条线搜索,而是循着二叉树的分叉不断向下搜索
2.二叉树的实现 1 2 3 4 5 6 7 8 9 10 11 12 13 14 15 16 17 18 19 20 21 22 23 24 25 26 27 28 29 30 31 32 33 34 35 36 37 38 39 40 41 42 43 44 45 46 47 48 49 50 51 52 53 54 55 56 57 58 59 60 61 62 63 64 65 66 67 68 69 70 71 72 73 74 75 76 77 78 79 80 81 82 83 84 85 86 87 88 89 90 91 92 93 94 95 96 97 98 99 100 101 #include <stdio.h> #include <stdlib.h> struct node { int data; struct node * left ; struct node * right ; }; void printPostorder (struct node* node) void printInorder (struct node* node) void printPreorder (struct node* node) struct node* newNode (int data) { struct node * node =malloc (sizeof (struct node)); node->data = data; node->left = NULL ; node->right = NULL ; return (node); } int main () struct node * root =1 ); root->left = newNode(2 ); root->right = newNode(3 ); root->left->left = newNode(4 ); root->left->right = newNode(5 ); printf ("后序顺序打印\n" ); printPostorder(root); printf ("\n" ) ; printf ("中序顺序打印\n" ); printInorder(root); printf ("\n" ) ; printf ("前序顺序打印\n" ); printPreorder(root); } void printPostorder (struct node* node) if (node==NULL ){ return ; } printPostorder(node->left); printPostorder(node->right); printf ("%d" , node->data); } void printInorder (struct node* node) if (node==NULL ){ return ; } printInorder(node->left); printf ("%d" , node->data); printInorder(node->right); } void printPreorder (struct node* node) if (node == NULL ){ return ; } printf ("%d" , node->data); printPreorder(node->left); printPreorder(node->right); }
3.二叉树原理图 (1)遍历方法示意图
