Spring MVC
1.MCV解析
MCV简介
- MVC是模型(Model)、视图(View)、控制器(Controller)的简写,是一种软件设计规范
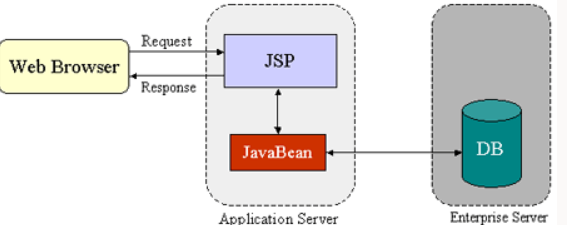
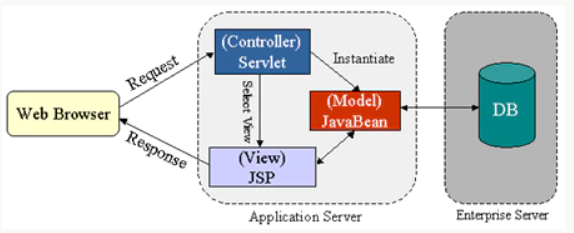
- 最典型的MVC就是JSP(视图) + servlet(控制器) + javabean(模型)的模式
- Model:提供了模型数据查询和模型数据的状态更新等功能,包括数据和业务
- View:负责进行模型的展示,即用户界面
- Controller:接收用户请求,委托给模型进行处理(状态改变),处理完毕后把返回的模型数据返回给视图,由视图负责展示
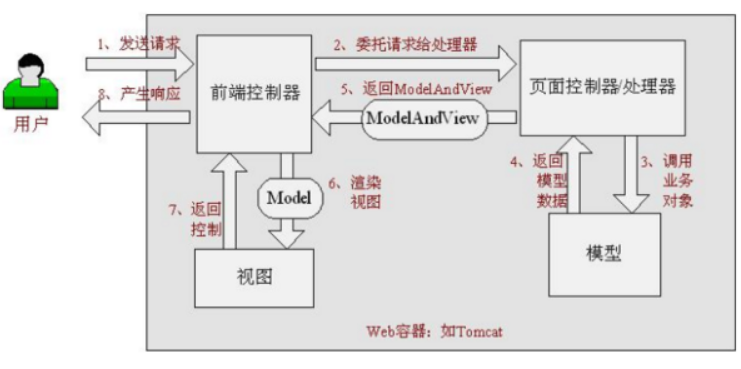
MCV架构图
Model1时代:
Model2时代:
MVC框架的工作
- 将url映射到java类或java类的方法 .
- 封装用户提交的数据 .
- 处理请求–调用相关的业务处理–封装响应数据 .
- 将响应的数据进行渲染 . jsp / html 等表示层数据 .
2.初识Spring MCV
Spring MCV简介
spring mcv特点:
- 轻量级,简单易学
- 高效 , 基于请求响应的MVC框架
- 与Spring兼容性好,无缝结合
- 约定优于配置
- 功能强大:RESTful、数据验证、格式化、本地化、主题等
- 简洁灵活
Spring MCV中心控制器
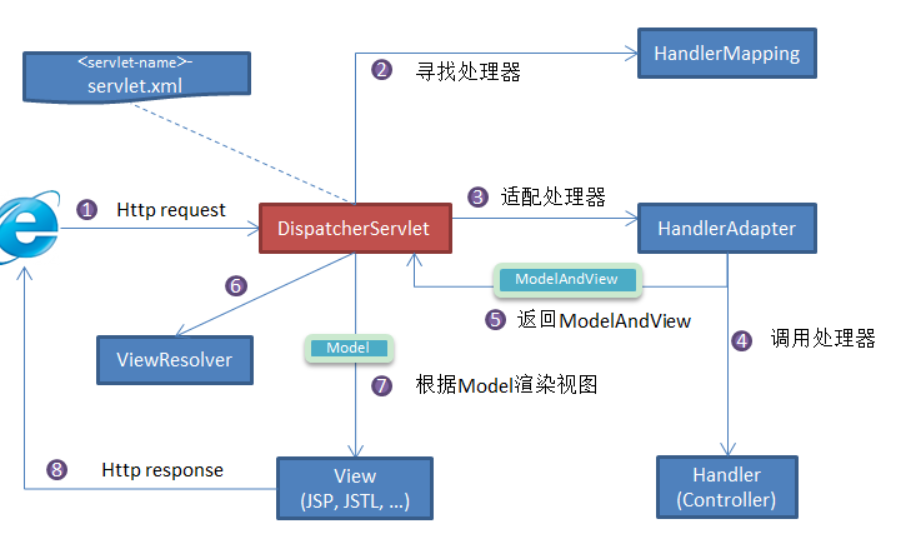
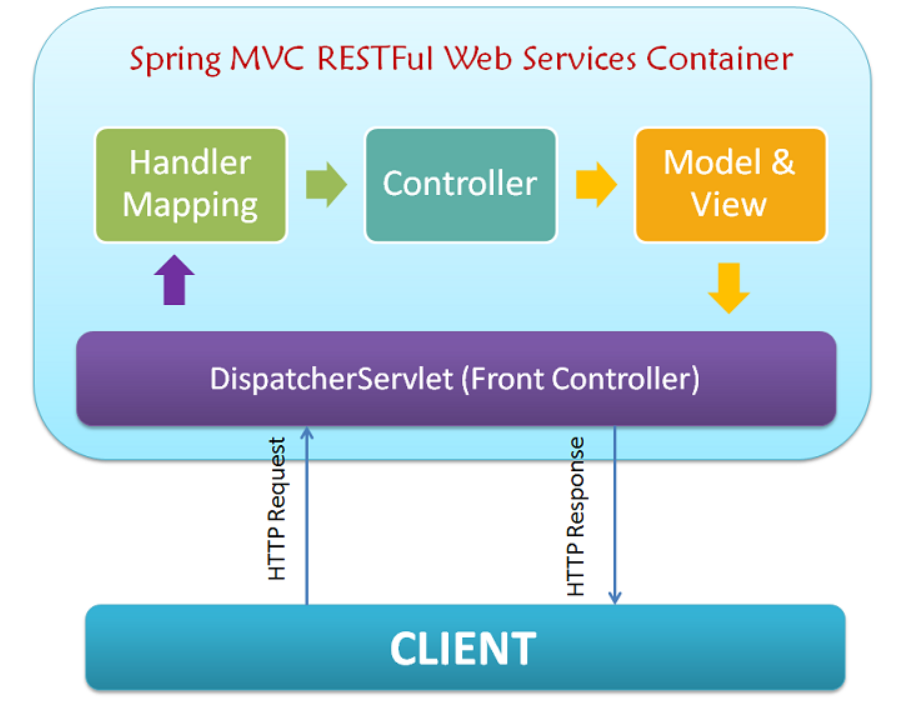
Spring MCV 以请求为驱动 , 围绕一个中心Servlet分派请求及提供其他功能,而这个中心就是DispatcherServlet(它是继承自HttpServlet 基类)
3.Spring MCV处理流程
Spring MCV处理流程
更加详细的展示如下:
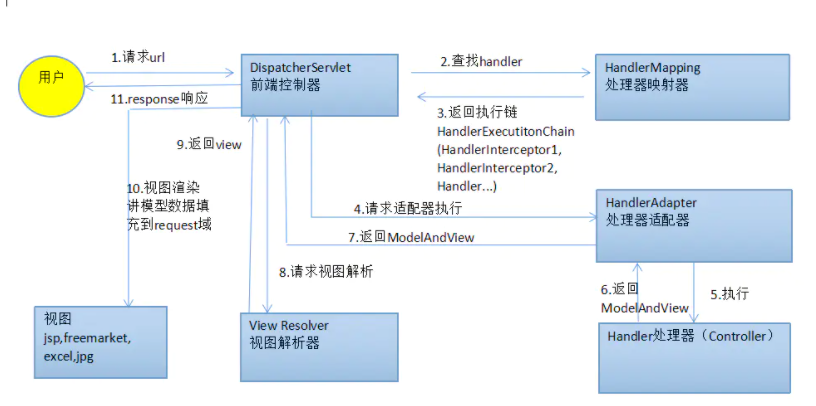
图上的连线表示SpringMVC框架已提供的技术,而需要进行开发的部分有:
- Handler处理器到数据库的部分
- Handler处理器到模型的部分
- 视图到模型的部分
- 视图解析器到视图的部分
Spring MCV处理流程代码实现(配置版)
- 编写配置文件
- 注册DispatcherServlet
- 添加处理映射器
- 添加处理适配器
- 添加视图解析器
- 编写业务Controller,返回ModelAndView(装数据,封视图)
- 将Controllor类注册到bean,形成映射
- 视图渲染显示ModellandView存放的数据
Spring MCV处理流程代码实现(注解版)
- 配置web.xml
- 注意web.xml版本问题,要最新版!
- 注册DispatcherServlet
- 关联SpringMVC的配置文件
- 启动级别为1
- 映射路径为 / 【不要用/*,会404】
1
2
3
4
5
6
7
8
9
10
11
12
13
14
15
16
17
18
|
<servlet>
<servlet-name>SpringMVC</servlet-name>
<servlet-class>org.springframework.web.servlet.DispatcherServlet</servlet-class>
<init-param>
<param-name>contextConfigLocation</param-name>
<param-value>classpath:springmvc-servlet.xml</param-value>
</init-param>
<load-on-startup>1</load-on-startup>
</servlet>
<servlet-mapping>
<servlet-name>SpringMVC</servlet-name>
<url-pattern>/</url-pattern>
</servlet-mapping>
|
- 添加Spring MVC配置文件
- 让IOC的注解生效
- 静态资源过滤 :HTML . JS . CSS . 图片 , 视频 …..
- MVC的注解驱动
- 配置视图解析器
1
2
3
4
5
6
7
8
9
10
11
12
13
14
15
16
17
18
19
20
21
22
23
24
|
<context:component-scan base-package="com.kuang.controller"/>
<mvc:default-servlet-handler />
<mvc:annotation-driven />
<bean class="org.springframework.web.servlet.view.InternalResourceViewResolver"
id="internalResourceViewResolver">
<property name="prefix" value="/WEB-INF/jsp/" />
<property name="suffix" value=".jsp" />
</bean>
|
在视图解析器中我们把所有的视图都存放在/WEB-INF/目录下,这样可以保证视图安全,因为这个目录下的文件,客户端不能直接访问
创建Controller
使用注解编写控制类
1
2
3
4
5
6
7
8
9
10
11
12
13
| @Controller
@RequestMapping("/HelloController")
public class HelloController {
@RequestMapping("/hello")
public String sayHello(Model model) {
model.addAttribute("msg", "hello,SpringMVC,我是成博");
return "hello";
}
}
|
- @Controller是为了让Spring IOC容器初始化时自动扫描到;
- @RequestMapping是为了映射请求路径,这里因为类与方法上都有映射所以访问时应该是/HelloController/hello;
- 方法中声明Model类型的参数是为了把Action中的数据带到视图中;
- 方法返回的结果是视图的名称hello,加上配置文件中的前后缀变成WEB-INF/jsp/hello.jsp
4.Controller的定义
实现接口Controller定义控制器法
该方法是较老的方法,而且定义方式比较麻烦,已不再广泛使用
使用注解@Controller法
@Controller注解类型用于声明Spring类的实例是一个控制器
为了保证Spring能找到你的控制器,需要在配置文件中声明组件扫描
1
2
|
<context:component-scan base-package="com.kuang.controller"/>
|
5.RestFul 风格
功能介绍
- 资源:互联网所有的事物都可以被抽象为资源
- 资源操作:使用POST、DELETE、PUT、GET,使用不同方法对资源进行操作。
- 分别对应 添加、 删除、修改、查询
@PathVariable 注解
@PathVariable 注解,可以让方法参数的值对应绑定到一个URL模板变量上
1
2
3
4
5
6
7
8
9
10
11
12
13
14
15
16
17
18
| @Controller
public class RestFulController {
@RequestMapping("/commit/{p1}/{p2}")
public String index(@PathVariable int p1, @PathVariable int p2, Model model){
int result = p1+p2;
model.addAttribute("msg", "结果:"+result);
return "test";
}
}
|
指定请求类型
1
2
3
4
5
6
|
@RequestMapping(value = "/hello",method = {RequestMethod.POST})
public String index2(Model model){
model.addAttribute("msg", "hello!");
return "test";
}
|
我们还可以使用组合注解指定请求类型
1
2
3
4
5
| @GetMapping
@PostMapping
@PutMapping
@DeleteMapping
@PatchMapping
|
6.SpringMVC的结果跳转
ModelAndView
设置ModelAndView对象 , 根据view的名称 , 和视图解析器跳到指定的页面 .
页面 : {视图解析器前缀} + viewName +{视图解析器后缀}
ServletAPI
通过设置ServletAPI , 不需要视图解析器 .
- 通过HttpServletResponse进行输出
- 通过HttpServletResponse实现重定向
- 通过HttpServletResponse实现转发
SpringMVC
- 通过SpringMVC来实现转发和重定向 - 无需视图解析器
- 通过SpringMVC来实现转发和重定向 - 有视图解析器
7.数据处理
处理提交的数据
提交的域名称和处理方法的参数名不一致
提交数据:[http://localhost](http://localhost/):8080/hello?username=test
1
2
3
4
5
6
|
@RequestMapping("/hello")
public String hello(@RequestParam("username") String name){
System.out.println(name);
return "hello";
}
|
提交的是一个对象
如果使用对象的话,前端传递的参数名和对象名必须一致,否则就是null
提交数据:http://localhost:8080/user?name=test&id=1&age=15
1
2
3
4
5
| @RequestMapping("/user")
public String user(User user){
System.out.println(user);
return "hello";
}
|
数据显示到前端
- 通过ModelAndView:可以在储存数据的同时,可以进行设置返回的逻辑视图,进行控制展示层的跳转
- 通过ModelMap:继承了 LinkedMap ,除了实现了自身的一些方法,同样的继承 LinkedMap 的方法和特性
- 通过Model:只有寥寥几个方法只适合用于储存数据,简化了新手对于Model对象的操作和理解
- 在类上直接使用 @RestController ,这样子,里面所有的方法都只会返回 json 字符串了
SSM整合
1.SSM功能
SSM即Spring + Spring MVC + MyBatis
- Spring MVC 负责实现MCV设计模式,MyBatis负责数据持久层,Spring负责管理Spring MVC和MyBatis相关的创建和依赖注入
- Spring MCV处理的是客户端与Java应用的关系,MyBatis处理的是Java应用与数据库的关系
2.SSM整合配置
Maven添加所需依赖
1
2
3
4
5
6
7
8
9
10
11
12
13
14
15
16
17
18
19
20
21
22
23
24
25
26
27
28
29
30
31
32
33
34
35
36
37
38
39
40
41
42
43
44
45
46
47
48
49
50
51
52
53
54
55
56
57
58
59
60
61
62
63
64
65
66
67
68
69
70
71
72
73
74
75
76
| <dependencies>
<dependency>
<groupId>org.springframework</groupId>
<artifactId>spring-webmvc</artifactId>
<version>5.0.11.RELEASE</version>
</dependency>
<dependency>
<groupId>org.springframework</groupId>
<artifactId>spring-jdbc</artifactId>
<version>5.0.11.RELEASE</version>
</dependency>
<dependency>
<groupId>org.springframework</groupId>
<artifactId>spring-aop</artifactId>
<version>5.0.11.RELEASE</version>
</dependency>
<dependency>
<groupId>org.springframework</groupId>
<artifactId>spring-aspects</artifactId>
<version>5.0.11.RELEASE</version>
</dependency>
<dependency>
<groupId>org.mybatis</groupId>
<artifactId>mybatis</artifactId>
<version>3.4.5</version>
</dependency>
<dependency>
<groupId>org.mybatis</groupId>
<artifactId>mybatis-spring</artifactId>
<version>1.3.1</version>
</dependency>
<dependency>
<groupId>mysql</groupId>
<artifactId>mysql-connector-java</artifactId>
<version>8.0.11</version>
</dependency>
<dependency>
<groupId>c3p0</groupId>
<artifactId>c3p0</artifactId>
<version>0.9.1.2</version>
</dependency>
<dependency>
<groupId>jstl</groupId>
<artifactId>jstl</artifactId>
<version>1.2</version>
</dependency>
<dependency>
<groupId>javax.servlet</groupId>
<artifactId>javax.servlet-api</artifactId>
<version>3.1.0</version>
</dependency>
<dependency>
<groupId>org.projectlombok</groupId>
<artifactId>lombok</artifactId>
<version>1.18.6</version>
<scope>provided</scope>
</dependency>
</dependencies>
|
web.xml配置
当我们启动一个web项目容器时,首先非去读取web.xml内的配置
容器加载web.xml的过程
- 首先读取配置文件中
<listener> </listener>和<context-param> </context-param>两个节点
- 紧接着,容器创建一个ServletContext(application),这个web项目的所有部分都将共享这个上下文
- 容器以
<context-param></context-param>的name作为键,value作为值,将其转化为键值对,存入ServletContext
- 容器创建
<listener></listener>中的类实例,根据配置的class类路径<listener-class>来创建监听,在监听中会有初始化方法
web.xml中配置SpringMCV,Spring,字符编码过滤器,加载静态资源
1
2
3
4
5
6
7
8
9
10
11
12
13
14
15
16
17
18
19
20
21
22
23
24
25
26
27
28
29
30
31
32
33
34
35
36
37
38
39
40
41
42
43
44
45
46
47
48
49
50
51
52
53
54
55
56
57
58
| <!DOCTYPE web-app PUBLIC
"-//Sun Microsystems, Inc.//DTD Web Application 2.3//EN"
"http://java.sun.com/dtd/web-app_2_3.dtd" >
<web-app>
<display-name>Archetype Created Web Application</display-name>
<context-param>
<param-name>contextConfigLocation</param-name>
<param-value>classpath:spring.xml</param-value>
</context-param>
<listener>
<listener-class>org.springframework.web.context.ContextLoaderListener</listener-class>
</listener>
<servlet>
<servlet-name>dispatcherServlet</servlet-name>
<servlet-class>org.springframework.web.servlet.DispatcherServlet</servlet-class>
<init-param>
<param-name>contextConfigLocation</param-name>
<param-value>classpath:springmvc.xml</param-value>
</init-param>
</servlet>
<servlet-mapping>
<servlet-name>dispatcherServlet</servlet-name>
<url-pattern>/</url-pattern>
</servlet-mapping>
<filter>
<filter-name>characterEncodingFilter</filter-name>
<filter-class>org.springframework.web.filter.CharacterEncodingFilter</filter-class>
<init-param>
<param-name>encoding</param-name>
<param-value>UTF-8</param-value>
</init-param>
</filter>
<filter-mapping>
<filter-name>characterEncodingFilter</filter-name>
<url-pattern>/*</url-pattern>
</filter-mapping>
<servlet-mapping>
<servlet-name>default</servlet-name>
<url-pattern>*.js</url-pattern>
</servlet-mapping>
<servlet-mapping>
<servlet-name>default</servlet-name>
<url-pattern>*.css</url-pattern>
</servlet-mapping>
<servlet-mapping>
<servlet-name>default</servlet-name>
<url-pattern>*.jpg</url-pattern>
</servlet-mapping>
</web-app>
|
spring.xml配置
spring.xml配置MyBatis和Spring的整合
1
2
3
4
5
6
7
8
9
10
11
12
13
14
15
16
17
18
19
20
21
22
23
24
25
26
27
28
29
30
31
32
| <?xml version="1.0" encoding="UTF-8"?>
<beans xmlns="http://www.springframework.org/schema/beans"
xmlns:xsi="http://www.w3.org/2001/XMLSchema-instance"
xmlns:context="http://www.springframework.org/schema/context"
xmlns:p="http://www.springframework.org/schema/p"
xsi:schemaLocation="http://www.springframework.org/schema/beans http://www.springframework.org/schema/beans/spring-beans-3.2.xsd
http://www.springframework.org/schema/context http://www.springframework.org/schema/context/spring-context-4.3.xsd
">
<bean id="dataSource" class="com.mchange.v2.c3p0.ComboPooledDataSource">
<property name="user" value="root"></property>
<property name="password" value="root"></property>
<property name="jdbcUrl" value="jdbc:mysql://localhost:3306/test?useUnicode=true&characterEncoding=UTF-8"></property>
<property name="driverClass" value="com.mysql.cj.jdbc.Driver"></property>
<property name="initialPoolSize" value="5"></property>
<property name="maxPoolSize" value="10"></property>
</bean>
<bean id="sqlSessionFactory" class="org.mybatis.spring.SqlSessionFactoryBean">
<property name="dataSource" ref="dataSource"></property>
<property name="mapperLocations" value="classpath:com/southwind/repository/*.xml"></property>
<property name="configLocation" value="classpath:config.xml"></property>
</bean>
<bean class="org.mybatis.spring.mapper.MapperScannerConfigurer">
<property name="basePackage" value="com.southwind.repository"></property>
</bean>
</beans>
|
config.xml 配置
config.xml 配置一些 MyBatis 辅助信息,比如打印 SQL 等
1
2
3
4
5
6
7
8
9
10
11
12
13
14
| <?xml version="1.0" encoding="UTF-8"?>
<!DOCTYPE configuration PUBLIC "-//mybatis.org//DTD Config 3.0//EN" "http://mybatis.org/dtd/mybatis-3-config.dtd">
<configuration>
<settings>
<setting name="logImpl" value="STDOUT_LOGGING" />
</settings>
<typeAliases>
<package name="com.southwind.entity"/>
</typeAliases>
</configuration>
|
springmvc.xml配置
1
2
3
4
5
6
7
8
9
10
11
12
13
14
15
16
17
18
19
20
21
22
| <?xml version="1.0" encoding="UTF-8"?>
<beans xmlns="http://www.springframework.org/schema/beans"
xmlns:xsi="http://www.w3.org/2001/XMLSchema-instance"
xmlns:context="http://www.springframework.org/schema/context"
xmlns:mvc="http://www.springframework.org/schema/mvc"
xsi:schemaLocation="http://www.springframework.org/schema/beans http://www.springframework.org/schema/beans/spring-beans-3.0.xsd
http://www.springframework.org/schema/context http://www.springframework.org/schema/context/spring-context-3.0.xsd
http://www.springframework.org/schema/mvc http://www.springframework.org/schema/mvc/spring-mvc-3.2.xsd">
<mvc:annotation-driven></mvc:annotation-driven>
<context:component-scan base-package="com.southwind"></context:component-scan>
<bean class="org.springframework.web.servlet.view.InternalResourceViewResolver">
<property name="prefix" value="/"></property>
<property name="suffix" value=".jsp"></property>
</bean>
</beans>
|
3.SSM实现步骤
创建实体类(Entity)
1
2
3
4
5
6
7
8
9
10
11
| package com.southwind.entity;
import lombok.Data;
@Data
public class User {
private long id;
private String name;
private String password;
private double score;
}
|
创建数据访问层(Repository)
实现dao访问
UserRepository访问数据库
1
2
3
4
5
6
7
8
9
| package com.southwind.repository;
import com.southwind.entity.User;
import java.util.List;
public interface UserRepository {
public List<User> findAll();
}
|
1
2
3
4
5
6
7
| <?xml version="1.0" encoding="UTF-8" ?>
<!DOCTYPE mapper PUBLIC "-//mybatis.org//DTD Mapper 3.0//EN" "http://mybatis.org/dtd/mybatis-3-mapper.dtd">
<mapper namespace="com.southwind.repository.UserRepository">
<select id="findAll" resultType="User">
select * from user
</select>
</mapper>
|
创建服务接口(Service)
服务层,注入dao主要用来进行业务的逻辑处理
1
2
3
4
5
6
7
8
9
| package com.southwind.service;
import com.southwind.entity.User;
import java.util.List;
public interface UserService {
public List<User> findAll();
}
|
实现服务接口(ServiceImpl)
1
2
3
4
5
6
7
8
9
10
11
12
13
14
15
16
17
18
19
20
21
| package com.southwind.service.impl;
import com.southwind.entity.User;
import com.southwind.repository.UserRepository;
import com.southwind.service.UserService;
import org.springframework.beans.factory.annotation.Autowired;
import org.springframework.stereotype.Service;
import java.util.List;
@Service
public class UserServiceImpl implements UserService {
@Autowired
private UserRepository userRepository;
@Override
public List<User> findAll() {
return userRepository.findAll();
}
}
|
实现控制器(Controller)
注入服务,映射url
1
2
3
4
5
6
7
8
9
10
11
12
13
14
15
16
17
18
19
20
21
22
23
| package com.southwind.controller;
import com.southwind.service.UserService;
import org.springframework.beans.factory.annotation.Autowired;
import org.springframework.stereotype.Controller;
import org.springframework.web.bind.annotation.GetMapping;
import org.springframework.web.bind.annotation.RequestMapping;
import org.springframework.web.servlet.ModelAndView;
@Controller
@RequestMapping("/user")
public class UserHandler {
@Autowired
private UserService userService;
@GetMapping("/findAll")
public ModelAndView findAll(){
ModelAndView modelAndView = new ModelAndView();
modelAndView.setViewName("index");
modelAndView.addObject("list",userService.findAll());
return modelAndView;
}
}
|


