
Maven导入依赖
1.解决依赖标红问题
java.lang.ClassNotFoundException: Cannot find class: XXX
- 在Maven仓库查找是否有对应版本
- 可以删除标红的版本粗暴解决
- 如果仍无法解决可以手动下载导入该jar
2.解决程序文件包引用问题
3.SSM常用依赖包
1
2
3
4
5
6
7
8
9
10
11
12
13
14
15
16
17
18
19
20
21
22
23
24
25
26
27
28
29
30
31
32
33
34
35
36
37
38
39
40
41
42
43
44
45
46
47
48
49
50
51
52
53
54
55
56
57
58
59
60
61
62
63
64
65
66
67
68
69
70
71
72
73
74
75
76
77
78
79
80
81
82
83
84
85
86
87
88
89
90
91
92
| <dependencies>
<dependency>
<groupId>org.springframework</groupId>
<artifactId>spring-core</artifactId>
<version>4.2.9.RELEASE</version>
</dependency>
<dependency>
<groupId>org.springframework</groupId>
<artifactId>spring-context</artifactId>
<version>4.2.9.RELEASE</version>
</dependency>
<dependency>
<groupId>org.springframework</groupId>
<artifactId>spring-beans</artifactId>
<version>4.2.9.RELEASE</version>
</dependency>
<dependency>
<groupId>org.springframework</groupId>
<artifactId>spring-web</artifactId>
<version>4.2.9.RELEASE</version>
</dependency>
<dependency>
<groupId>org.springframework</groupId>
<artifactId>spring-jdbc</artifactId>
<version>4.2.9.RELEASE</version>
</dependency>
<dependency>
<groupId>org.springframework</groupId>
<artifactId>spring-webmvc</artifactId>
<version>4.2.9.RELEASE</version>
</dependency>
<dependency>
<groupId>mysql</groupId>
<artifactId>mysql-connector-java</artifactId>
<version>3.1.14</version>
</dependency>
<dependency>
<groupId>org.mybatis</groupId>
<artifactId>mybatis</artifactId>
<version>3.4.1</version>
</dependency>
<dependency>
<groupId>org.mybatis</groupId>
<artifactId>mybatis-spring</artifactId>
<version>1.3.1</version>
</dependency>
<dependency>
<groupId>javax.servlet.jsp</groupId>
<artifactId>jsp-api</artifactId>
<version>2.1</version>
<scope>provided</scope>
</dependency>
<dependency>
<groupId>javax.servlet</groupId>
<artifactId>jstl</artifactId>
<version>1.2</version>
</dependency>
<dependency>
<groupId>taglibs</groupId>
<artifactId>standard</artifactId>
<version>1.1.2</version>
</dependency>
<dependency>
<groupId>javax.servlet</groupId>
<artifactId>javax.servlet-api</artifactId>
<version>3.1.0</version>
<scope>provided</scope>
</dependency>
<dependency>
<groupId>com.fasterxml.jackson.core</groupId>
<artifactId>jackson-databind</artifactId>
<version>2.8.11</version>
</dependency>
<dependency>
<groupId>junit</groupId>
<artifactId>junit</artifactId>
<version>4.12</version>
</dependency>
<dependency>
<groupId>org.springframework</groupId>
<artifactId>spring-test</artifactId>
<version>4.2.9.RELEASE</version>
</dependency>
</dependencies>
|
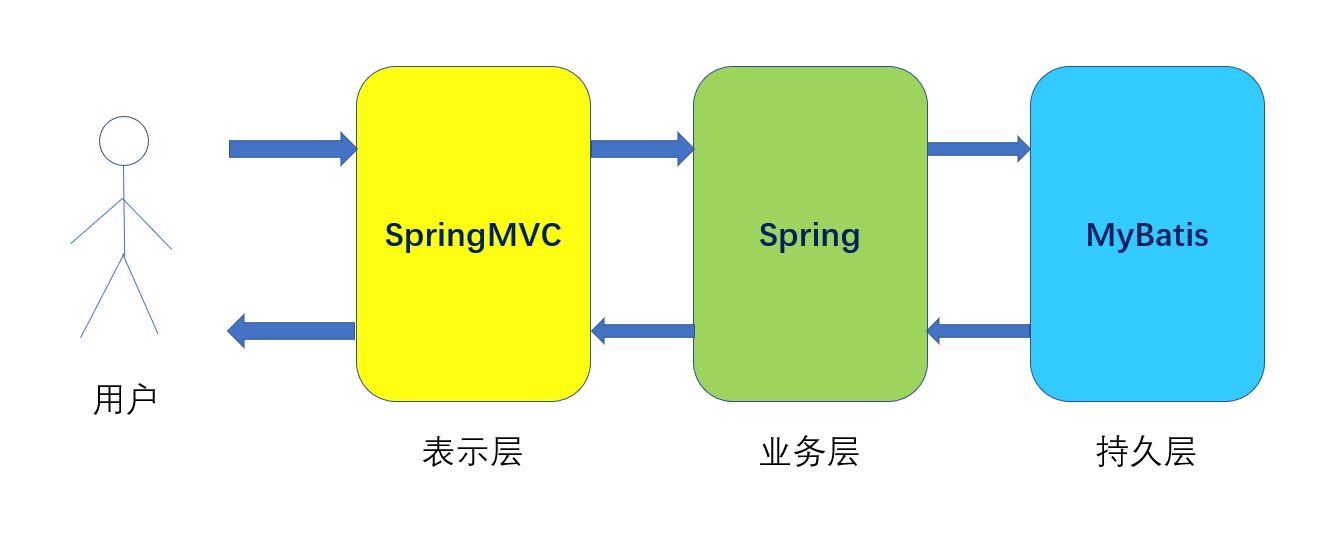
目录结构
1.整体架构
2.主程序分层
业务逻辑:
Controller–>service接口–>serviceImpl–>dao接口–>daoImpl–>mapper–>db
执行流程:

而bean/pojo则是实体类作为各层次处理传递的对象:
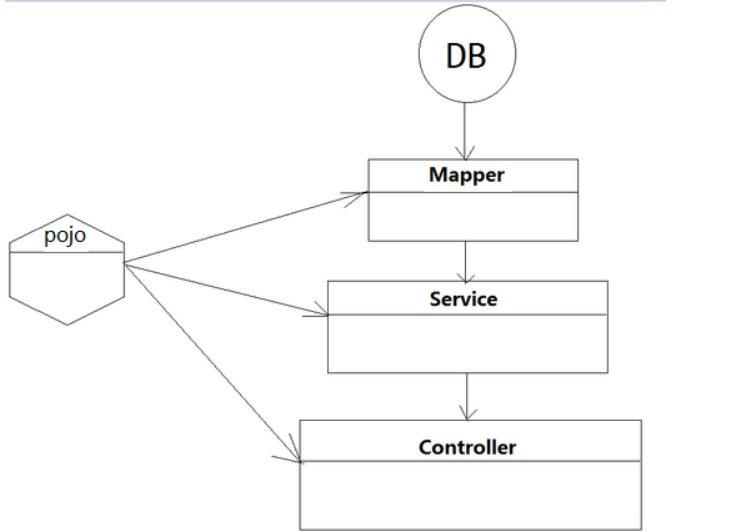
相关配置文件
1.web.xml
一般放在web文件夹的WEB-INF文件下,用于配置SSM整体的框架配置,以下是常用的配置项
1.启动Spring容器
指向applicationContext.xml配置文件
1
2
3
4
5
6
7
| <context-param>
<param-name>contextConfigLocation</param-name>
<param-value>classpath:applicationContext.xml</param-value>
</context-param>
<listener>
<listener-class>org.springframework.web.context.ContextLoaderListener</listener-class>
</listener>
|
2.springmvc的前端控制器,拦截所有请求
1
2
3
4
5
6
7
8
9
10
11
12
13
14
15
|
<servlet>
<servlet-name>mvc-dispatcher</servlet-name>
<servlet-class>org.springframework.web.servlet.DispatcherServlet</servlet-class>
<init-param>
<param-name>contextConfigLocation</param-name>
<param-value>classpath:springMVC.xml</param-value>
</init-param>
<load-on-startup>1</load-on-startup>
</servlet>
<servlet-mapping>
<servlet-name>mvc-dispatcher</servlet-name>
<url-pattern>/</url-pattern>
</servlet-mapping>
|
3.字符编码过滤器
1
2
3
4
5
6
7
8
9
10
11
12
13
14
15
16
17
18
19
20
21
|
<filter>
<filter-name>CharacterEncodingFilter</filter-name>
<filter-class>org.springframework.web.filter.CharacterEncodingFilter</filter-class>
<init-param>
<param-name>encoding</param-name>
<param-value>utf-8</param-value>
</init-param>
<init-param>
<param-name>forceRequestEncoding</param-name>
<param-value>true</param-value>
</init-param>
<init-param>
<param-name>forceResponseEncoding</param-name>
<param-value>true</param-value>
</init-param>
</filter>
<filter-mapping>
<filter-name>CharacterEncodingFilter</filter-name>
<url-pattern>/*</url-pattern>
</filter-mapping>
|
4.Rest API配置
1
2
3
4
5
6
7
8
9
|
<filter>
<filter-name>HiddenHttpMethodFilter</filter-name>
<filter-class>org.springframework.web.filter.HiddenHttpMethodFilter</filter-class>
</filter>
<filter-mapping>
<filter-name>HiddenHttpMethodFilter</filter-name>
<url-pattern>/*</url-pattern>
</filter-mapping>
|
5.数据包解析配置
1
2
3
4
5
6
7
8
9
|
<filter>
<filter-name>HttpPutFormContentFilter</filter-name>
<filter-class>org.springframework.web.filter.HttpPutFormContentFilter</filter-class>
</filter>
<filter-mapping>
<filter-name>HttpPutFormContentFilter</filter-name>
<url-pattern>/*</url-pattern>
</filter-mapping>
|
2.applicationContext.xml
整合spring和mybatis配置,一般用于配置数据库连接和数据库实体类,mapper实体类(可用于自动装配)
1
2
3
4
5
6
7
8
9
10
11
12
13
14
15
16
17
18
19
20
21
22
23
24
25
26
27
28
29
30
31
32
33
34
35
36
37
38
39
40
41
42
43
44
45
46
47
48
49
50
51
| <?xml version="1.0" encoding="UTF-8"?>
<beans xmlns="http://www.springframework.org/schema/beans"
xmlns:xsi="http://www.w3.org/2001/XMLSchema-instance" xmlns:aop="http://www.springframework.org/schema/aop"
xmlns:tx="http://www.springframework.org/schema/tx" xmlns:jdbc="http://www.springframework.org/schema/jdbc"
xmlns:context="http://www.springframework.org/schema/context"
xmlns:mvc="http://www.springframework.org/schema/mvc"
xsi:schemaLocation="
http://www.springframework.org/schema/context http://www.springframework.org/schema/context/spring-context-3.0.xsd
http://www.springframework.org/schema/beans http://www.springframework.org/schema/beans/spring-beans-3.0.xsd
http://www.springframework.org/schema/jdbc http://www.springframework.org/schema/jdbc/spring-jdbc-3.0.xsd
http://www.springframework.org/schema/tx http://www.springframework.org/schema/tx/spring-tx-3.0.xsd
http://www.springframework.org/schema/aop http://www.springframework.org/schema/aop/spring-aop-3.0.xsd
http://www.springframework.org/schema/mvc http://www.springframework.org/schema/mvc/spring-mvc.xsd">
<context:annotation-config/>
<bean id="dataSource" class="org.springframework.jdbc.datasource.DriverManagerDataSource">
<property name="driverClassName">
<value>com.mysql.jdbc.Driver</value>
</property>
<property name="url">
<value>jdbc:mysql://localhost:3306/mybatis?useUnicode=true&characterEncoding=UTF-8</value>
</property>
<property name="username">
<value>admin</value>
</property>
<property name="password">
<value>123456</value>
</property>
</bean>
<bean id="sqlSession" class="org.mybatis.spring.SqlSessionFactoryBean">
<property name="typeAliasesPackage" value="pojo"/>
<property name="dataSource" ref="dataSource"/>
<property name="mapperLocations" value="classpath:mapper/*.xml"/>
</bean>
<bean class="org.mybatis.spring.mapper.MapperScannerConfigurer">
<property name="basePackage" value="com.comments.mapper"/>
</bean>
</beans>
|
3.springmvc.xml
主要用于管理映射关系和视图的定位
1
2
3
4
5
6
7
8
9
10
11
12
13
14
15
16
17
18
19
20
21
22
23
24
25
26
27
28
29
30
31
32
33
34
35
36
37
| <?xml version="1.0" encoding="UTF-8"?>
<beans xmlns="http://www.springframework.org/schema/beans"
xmlns:xsi="http://www.w3.org/2001/XMLSchema-instance" xmlns:aop="http://www.springframework.org/schema/aop"
xmlns:tx="http://www.springframework.org/schema/tx" xmlns:jdbc="http://www.springframework.org/schema/jdbc"
xmlns:context="http://www.springframework.org/schema/context"
xmlns:mvc="http://www.springframework.org/schema/mvc"
xsi:schemaLocation="http://www.springframework.org/schema/jdbc http://www.springframework.org/schema/jdbc/spring-jdbc-3.0.xsd
http://www.springframework.org/schema/aop http://www.springframework.org/schema/aop/spring-aop-3.0.xsd
http://www.springframework.org/schema/beans http://www.springframework.org/schema/beans/spring-beans-3.0.xsd
http://www.springframework.org/schema/context http://www.springframework.org/schema/context/spring-context-3.0.xsd
http://www.springframework.org/schema/tx http://www.springframework.org/schema/tx/spring-tx-3.0.xsd
http://www.springframework.org/schema/mvc http://www.springframework.org/schema/mvc/spring-mvc-3.2.xsd">
<context:annotation-config/>
<context:component-scan base-package="com.app.controller">
<context:include-filter type="annotation"
expression="org.springframework.stereotype.Controller"/>
</context:component-scan>
<mvc:annotation-driven/>
<mvc:default-servlet-handler/>
<bean
class="org.springframework.web.servlet.view.InternalResourceViewResolver">
<property name="viewClass"
value="org.springframework.web.servlet.view.JstlView"/>
<property name="prefix" value="/WEB-INF/jsp/"/>
<property name="suffix" value=".jsp"/>
</bean>
</beans>
|
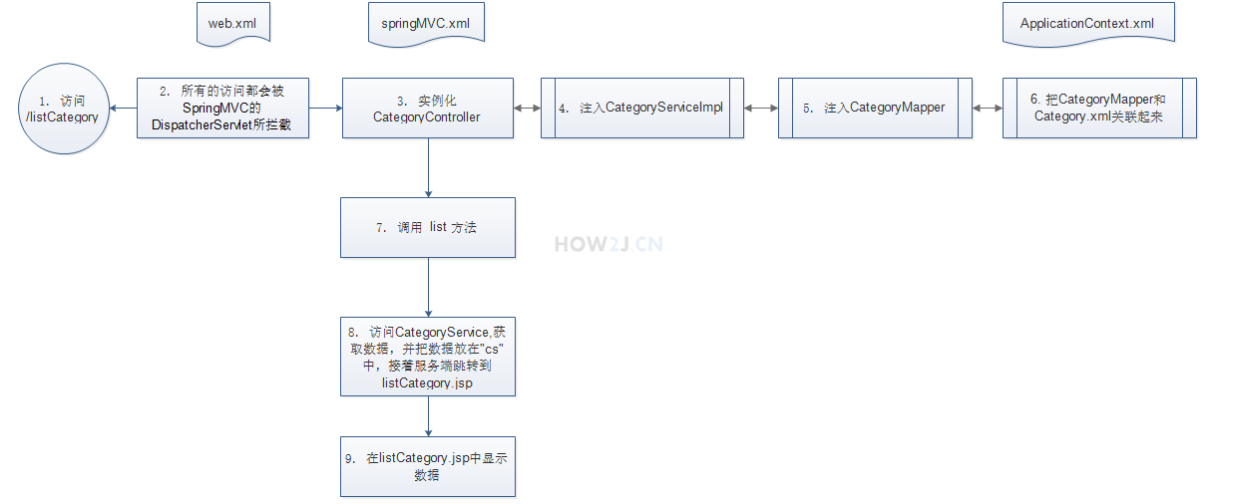
4.配置文件处理流程
Bean层
首先创建实体层,实体层是各层次用于输入输出处理的数据对象可以参照数据库设计所需的对象与属性
1.Java Bean概念
JavaBeans是Java一种特殊的类,既可以是单独的类型,也可以将多个对象封装到一个类中。
在系统设计中,其常常对应数据库的字段抽象
区别于其他的类,Bean一定会有提供getter和setter方法访问对象的每一个私有属性
2.Java Bean构造方法
手动编码
1
2
3
4
5
6
7
8
9
10
11
12
13
14
15
16
17
18
| private long id;
private String content;
public long getId() {
return id;
}
public void setId(long id) {
this.id = id;
}
public String getContent() {
return content;
}
public void setContent(String content) {
this.content = content;
}
|
数据库生成
Idea可以通过数据库工具生成Bean实体类
连接好数据库(注意某些版本的mysql需要填写时区,一般我会填为GMT)
依据数据表生成Bean
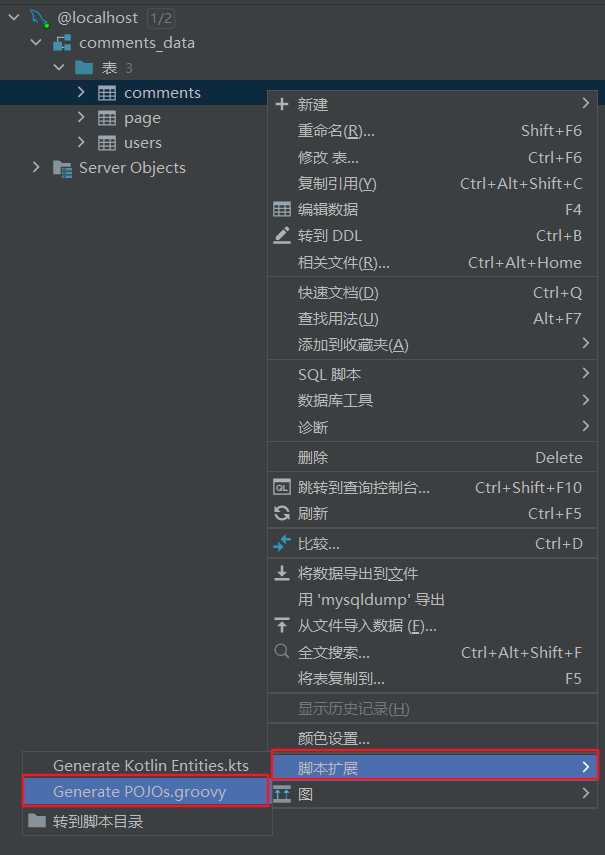
Lombok插件补全
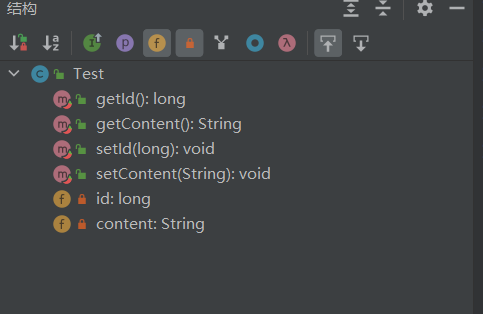
通过lombok工具,我们只需要在Bean属性添加相关注解,idea会自动为我们生成getter和setter方法
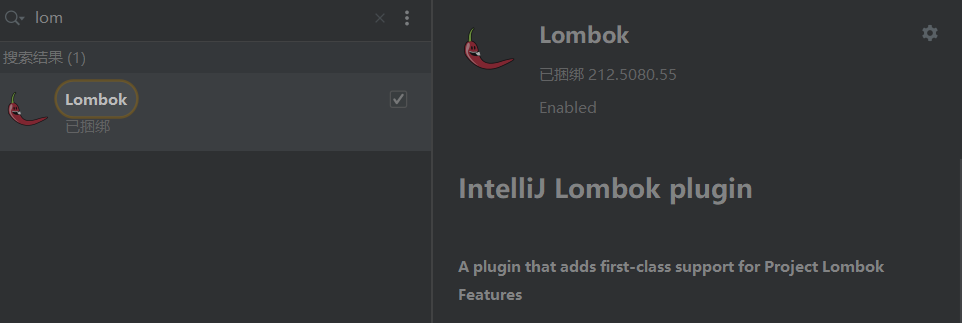
- idea中安装插件Lombok(最新版idea已捆绑)
1
2
3
4
5
| <dependency>
<groupId>org.projectlombok</groupId>
<artifactId>lombok</artifactId>
<version>1.16.20</version>
</dependency>
|
编写Bean与注解
1
2
3
4
5
6
7
| @Getter
@Setter
private long id;
@Getter
@Setter
private String content;
|
自动生成方法
Dao层
1.构建SQL
Dao层(即Mapper层)内有两个文件,Mapper文件创建方法对应到xml文件映射sql语句处理实体类
xml文件
1
2
3
4
5
6
7
8
9
10
11
12
13
14
15
16
17
18
19
20
21
22
23
24
25
26
27
| <?xml version="1.0" encoding="UTF-8" ?>
<!DOCTYPE mapper
PUBLIC "-//mybatis.org//DTD Mapper 3.0//EN"
"http://mybatis.org/dtd/mybatis-3-mapper.dtd">
<mapper namespace="com.app.mapper.CategoryMapper">
<insert id="add" parameterType="Category" >
insert into category_ ( name ) values (#{name})
</insert>
<delete id="delete" parameterType="Category" >
delete from category_ where id= #{id}
</delete>
<select id="get" parameterType="_int" resultType="com.app.pojo.Category">
select * from category_ where id= #{id}
</select>
<update id="update" parameterType="Category" >
update category_ set name=#{name} where id=#{id}
</update>
<select id="list" resultType="com.app.pojo.Category">
select * from category_
</select>
</mapper>
|
Mapper文件
1
2
3
4
5
6
7
8
9
10
11
12
13
14
15
16
17
18
19
20
21
22
| package com.app.mapper;
import com.app.pojo.Category;
import java.util.List;
public interface CategoryMapper {
public int add(Category category);
public void delete(int id);
public Category get(int id);
public int update(Category category);
public List<Category> list();
public int count();
}
|
1
2
3
4
5
6
7
8
9
10
11
12
13
14
15
16
17
18
19
20
|
public interface CategoryMapper {
@InsertProvider(type = CategoryDynaSqlProvider.class, method = "add")
public int add(Category category);
@DeleteProvider(type = CategoryDynaSqlProvider.class, method = "delete")
public void delete(int id);
@SelectProvider(type = CategoryDynaSqlProvider.class, method = "get")
public Category get(int id);
@UpdateProvider(type = CategoryDynaSqlProvider.class, method = "update")
public int update(Category category);
@SelectProvider(type = CategoryDynaSqlProvider.class, method = "list")
public List<Category> list();
}
|
用Java表示sql语句,达到sql语句动态化效果
SqlProvider文件
1
2
3
4
5
6
7
8
9
10
11
12
13
14
15
16
17
18
19
20
21
22
23
24
25
26
27
28
29
30
31
32
33
34
35
36
37
38
39
40
41
42
43
44
45
46
47
48
49
50
51
52
53
54
55
|
public String list(){
return new SQL()
.SELECT("*")
.FROM("users")
.toString();
}
public String get(){
return new SQL()
.SELECT("*")
.FROM("users")
.WHERE("id=#{id}")
.toString();
}
public String getname(){
return new SQL()
.SELECT("name")
.FROM("users")
.WHERE("name=#{name}")
.toString();
}
public String add(){
return new SQL()
.INSERT_INTO("users")
.VALUES("name", "#{name}")
.VALUES("password","#{password}")
.VALUES("role","#{role}")
.toString();
}
public String update(){
return new SQL()
.UPDATE("users")
.SET("name=#{name}")
.SET("password=#{password}")
.SET("role=#{role}")
.WHERE("id=#{id}")
.toString();
}
public String delete(){
return new SQL()
.DELETE_FROM("users")
.WHERE("id=#{id}")
.toString();
}
|
Mapper文件
1
2
3
4
5
6
7
8
9
10
11
12
13
14
15
16
17
18
19
20
21
22
23
24
25
26
27
28
29
30
|
@Mapper
public interface UserMapper {
@InsertProvider(type=UsersSqlProvider.class,method="add")
public int add(Users users);
@DeleteProvider(type=UsersSqlProvider.class,method="delete")
public void delete(int id);
@SelectProvider(type=UsersSqlProvider.class,method="get")
public Users get(int id);
@SelectProvider(type=UsersSqlProvider.class,method="getname")
public Users getname(String name);
@UpdateProvider(type=UsersSqlProvider.class,method="update")
public int update(Users users);
@SelectProvider(type=UsersSqlProvider.class,method="list")
public List<Users> list();
}
|
2.Mapper的自动装配
applicationContext配置扫描Mpaper类,Spring自动装配Mapper类
1
2
3
4
5
6
7
8
9
10
11
12
13
14
|
<bean id="sqlSession" class="org.mybatis.spring.SqlSessionFactoryBean">
<property name="typeAliasesPackage" value="pojo"/>
<property name="dataSource" ref="dataSource"/>
<property name="mapperLocations" value="classpath:com/comments/mapper/*.xml"/>
</bean>
<bean class="org.mybatis.spring.mapper.MapperScannerConfigurer">
<property name="basePackage" value="com.comments.mapper"/>
</bean>
|
3.Mapper测试
mapper层测试方法:其用与serivce层的实现类一样的方法对mapper层进行调用,从而实现对mapper层的测试
1
2
3
4
5
6
7
8
9
10
11
12
13
14
15
16
17
18
19
20
21
22
23
24
25
26
27
28
29
30
31
32
33
34
| @RunWith(SpringJUnit4ClassRunner.class)
@ContextConfiguration(locations = {"classpath:applicationContext.xml", "classpath:springMVC.xml"})
public class UserMapperTest extends TestCase {
@Autowired
private UserMapper userMapper;
@Test
public void testList() {
List<Users> user = userMapper.list();
for(Users u :user){
System.out.println(u.getName());
}
}
@Test
public void testInsert(){
Users user = new Users();
user.setName("test");
user.setPassword("123456");
user.setRole("vistor");
userMapper.add(user);
testList();
}
}
|
Serivce层
服务层有serivce接口和serivceimlmpl实现两个文件,该层主要用于调用dao层与数据库交互并为controller层提供服务
1.serivce接口
- 其函数构成与mapper文件类似(都是一些增删改查的方法),serivce内的函数可以以一些需要用户填写的字段作为参数
- 但是mapper是面向dao层使用的(与数据库联系)
- 而serivce是面向controller层使用的(与用户端联系)
1
2
3
4
5
6
7
8
9
10
11
12
13
14
15
16
17
18
19
20
21
22
23
24
|
public interface UsersService {
List<Users> list();
int add(String name, String password, String role);
int delete(int id);
Users get(int id);
Users getname(String name);
int update(int id ,String name, String password);
}
|
2.serivceimlmpl实现类
- serivce接口的具体实现
- 注解Service(类似于@Component,@Controller)
- 将类自动注册到Spring容器,而不需要定义bean
- 控制类可以直接通过接口调用到其实现类中的方法
1
2
3
4
5
6
7
8
9
10
11
12
13
14
15
16
17
18
19
20
21
22
23
24
25
26
27
28
29
30
31
32
33
34
35
36
37
38
39
40
41
42
43
44
45
46
47
48
49
50
51
52
53
54
55
56
57
58
59
60
61
62
63
64
65
66
67
| @Service
public class UsersServiceImpl implements UsersService{
@Autowired
UserMapper userMapper;
public List<Users> list(){
List<Users> user = userMapper.list();
for(Users u :user){
System.out.println(u.getName());
}
return user;
}
public int add(String name, String password, String role){
Users users = new Users();
users.setName(name);
users.setPassword(password);
users.setRole(role);
userMapper.add(users);
return 1;
}
public int delete(int id){
userMapper.delete(id);
return 1;
}
public Users get(int id){
Users user = userMapper.get(id);
return user;
}
public Users getname(String name){
Users user = userMapper.getname(name);
return user;
}
public int update(int id ,String name, String password){
Users users = userMapper.get(id);
users.setName(name);
users.setPassword(password);
userMapper.update(users);
return 1;
}
}
|
3.Serivce的自动装配
1
2
3
4
5
6
7
8
9
10
|
<context:component-scan base-package="com.comments.controller">
<context:include-filter type="annotation"
expression="org.springframework.stereotype.Controller"/>
</context:component-scan>
<context:component-scan base-package="com.comments.service">
</context:component-scan>
|
4.Serivce层测试
加载配置文件,并装配服务对象进行测试
1
2
3
4
5
6
7
8
9
10
11
12
13
14
15
16
17
18
19
20
21
22
23
24
25
26
27
28
29
30
31
32
33
34
35
36
37
38
39
40
41
42
43
44
45
46
47
48
49
|
@RunWith(SpringJUnit4ClassRunner.class)
@ContextConfiguration(locations = {"classpath:applicationContext.xml", "classpath:springMVC.xml"})
public class UsersServiceImplTest extends TestCase {
private final Logger logger = LoggerFactory.getLogger(this.getClass());
@Autowired
private UsersService usersService;
@Test
public void testList() throws Exception {
usersService.list();
}
@Test
public void testInsert() throws Exception{
int res = usersService.add("精灵","test","vistor");
System.out.println(res);
}
@Test
public void testGet1() throws Exception{
Users user = usersService.get(2);
System.out.println(user);
}
@Test
public void testGet2() throws Exception{
Users user = usersService.getname("1111");
System.out.println(user);
}
@Test
public void testupdate() throws Exception{
int res = usersService.update(2,"test","12345");
System.out.println(res);
}
}
|
Json消息体
1.自定义Json消息体
建立util文件放入JsonMsg类,用于设置Json返回对象
1
2
3
4
5
6
7
| public String jsonmsg(String staut, String msg){
JSONObject jsonObject = new JSONObject();
jsonObject.put(staut, msg);
return jsonObject.toJSONString();
}
|
2.Fastjson
Fastjson 是一个 Java 库,可以将 Java 对象转换为 JSON 格式,当然它也可以将 JSON 字符串转换为 Java 对象
- 添加maven依赖
- 使用注解获得相应的JSONField / 创建JSON对象输出
Controller层
负责调用服务层的方法,并映射路径提供给客户端使用
1.请求映射
- 路径映射
- 请求方式
- Controller默认以返回值去寻找资源,如果配置了jsp则会寻找对应jsp,加上@ResponseBody注解则直接输出返回的内容(如json)
1
2
3
4
5
6
7
8
9
|
@RequestMapping(value = "/list/{id}", method = RequestMethod.GET, produces = "application/json; charset=utf-8")
@ResponseBody
public String getuser(@PathVariable("id") int id){
Users res = usersService.get(id);
return JSONObject.toJSONString(res);
}
|
2.请求数据获取
3.中文乱码问题
1
2
3
4
5
6
7
8
9
10
11
12
13
14
15
16
17
| <!-- 编码过滤器 -->
<filter>
<filter-name>characterEncodingFilter</filter-name>
<filter-class>org.springframework.web.filter.CharacterEncodingFilter</filter-class>
<init-param>
<param-name>encoding</param-name>
<param-value>UTF-8</param-value>
</init-param>
<init-param>
<param-name>forceEncoding</param-name>
<param-value>true</param-value>
</init-param>
</filter>
<filter-mapping>
<filter-name>characterEncodingFilter</filter-name>
<url-pattern>/*</url-pattern>
</filter-mapping>
|
@RequestMapping注解可以设置发送和接收数据类型
1
| @RequestMapping(value = "/delete/{id}", method = RequestMethod.DELETE, produces = "application/json; charset=utf-8")
|
4.Controller自动装配
如果仅仅是返回json可以配置驱动,如果有jsp页面则需要配置静态页面并且视图定位
1
2
3
4
5
6
7
8
9
10
11
12
13
14
|
<mvc:annotation-driven/>
<mvc:default-servlet-handler/>
<bean
class="org.springframework.web.servlet.view.InternalResourceViewResolver">
<property name="viewClass"
value="org.springframework.web.servlet.view.JstlView"/>
<property name="prefix" value="/WEB-INF/jsp/"/>
<property name="suffix" value=".jsp"/>
</bean>
|
5.Controller层测试
- 使用mock模拟用户进行测试(比较复杂,一般不建议使用)
- 运行tomcat服务器后,使用浏览器+postman进行测试
System.out.println控制台输出
Web服务器添加
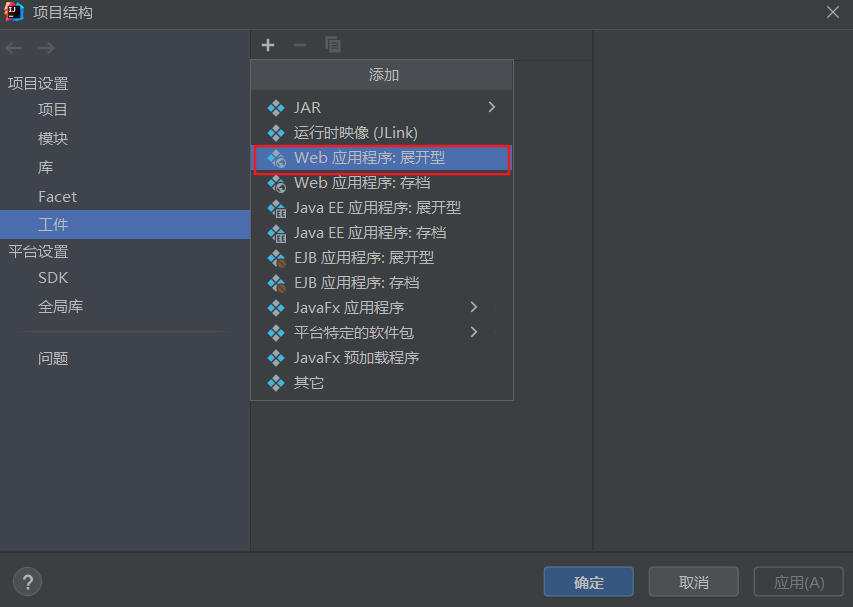
1.添加WEB工件
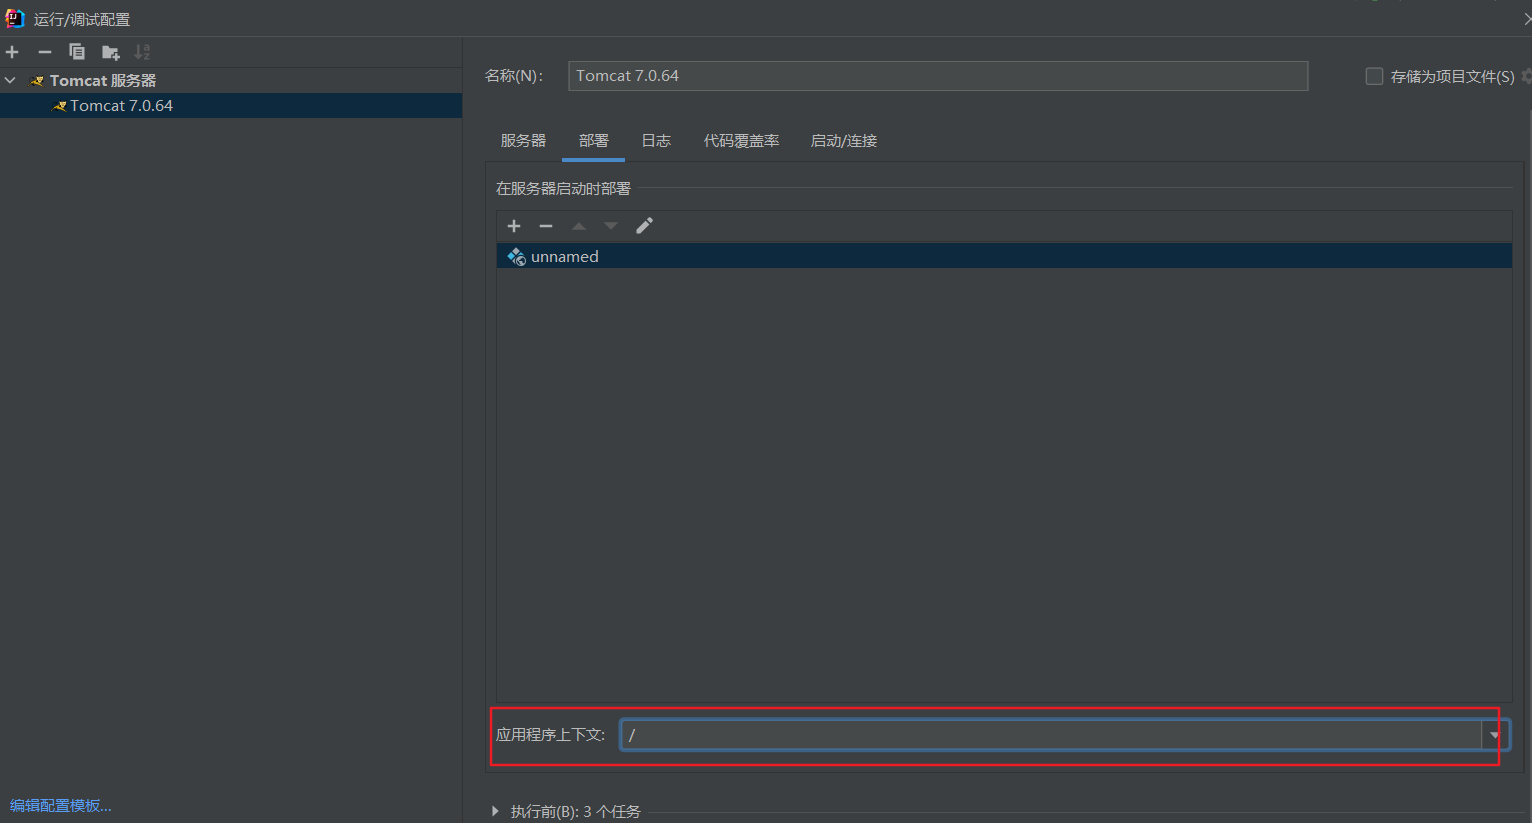
2.配置tomcat服务器

添加刚才创建的工件(注意修改上下文,这里影响访问的url)
3.测试服务器
出现端口冲突,可以修改http端口和JMX端口,但要注意修改tomcat的server.xml文件为对应的http端口

也可以找到正在运行的端口,然后关闭其进程
1
| netstat -aon|findstr 8080
|
号


