支持国产😇
Vue 1.项目启动 安装依赖包 Vue的依赖文件是package.json,其分为两部分
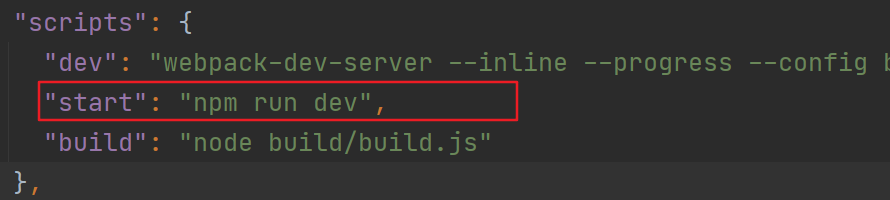
删除全部依赖 生成依赖文件package.json 启动项目 启动项目的命令需要看package.json文件
所以要用npm run dev启动项目
2.登录页面解析 ref访问子组件实例与元素 vue的ref有类似于html的id的功能,可以用来给js访问子组件实例或元素
html
1 <base-input ref ="usernameInput" > </base-input >
Vue
1 this.$refs.usernameInput
这样即可访问到输入框的内容
组件的属性和方法 html
1 2 3 4 5 6 7 8 9 <Form ref ="loginForm" :model ="form" :rules ="rules" > <FormItem prop ="user_name" > <Input v-model ="form.user_name" placeholder ="请输入用户名" > <span slot ="prepend" > <Icon :size ="16" type ="person" > </Icon > </span > </Input > </FormItem > </Form >
Vue
1
2
3
4
5
6
data () { form: { user_name: '' , password: '' } }
通过:model="form"的双向绑定,相当于视图上的数据与Vue对象上的数据是同步变化的
3.http请求 参考:How to use async/await in Vue.js?
Vue异步更新 异步即几个程序同时开始,不会出现阻塞的现象,Vue进行网络请求时会出现异步现象导致函数执行不同
同步(按序执行,阻塞现象)
1
2
3
4
5
6
7
8
9
10
11
12
13
created (){ this .getA() console .log(2 ) this .getB() }, methods : { getA (){ console .log(1 ) }, getB (){ console .log(3 ) } }
结果:
异步(多个函数同时开始,结束时间决定出现顺序)
1 2 3 4 5 6 7 8 9 10 11 12 13 14 15 16 created (){ this .getA() console .log(2 ) this .getB() }, methods : { getA (){ $axios.post(`/getA` ,params){ .then((result ) => { console .log(1 ) }) }, getB (){ console .log(3 ) } }
结果:
让程序同步 可以通过then或async/await使函数同步
then
1 2 3 4 5 6 7 8 9 10 11 12 13 14 15 created () { this .getA().then((result ) => { console .log(1 ) console .log(2 ) this .getB() }) }, methods : { getA () { return $axios.post(`/getA` ,params); }, getB (){ console .log(3 ) } }
async/await
1 2 3 4 5 6 7 8 9 10 11 12 13 14 async created (){ await this .getA() console .log(1 ) console .log(2 ) this .getB() }, methods : { getA : async () => { return $axios.post(`/getA` ,params); }, getB : () => { console .log(3 ) } }
created() 不需要让运行同步,只需要保证最后结束的函数(网络请求函数)正确赋值即可
采用异步的函数先通过created(相当于js页面加载即执行)执行完axios,赋值给data中的数据
1 2 3 4 5 6 7 8 9 10 11 12 13 14 15 16 17 18 19 20 21 created ( this .getLists(); }, methods: { getLists ( var url = this .$base.url.ExpertFinishGetLists; let page = parseInt (Cookies.get('page' )) if (page) { this .params.page = page } this .$post(url,this .params).then(res => this .data = res.data; }) }
ThinkPHP5 参考文章:https://www.soolco.com/post/62551_1_1.html
1.路由配置 配置为在thinkphp/public文件
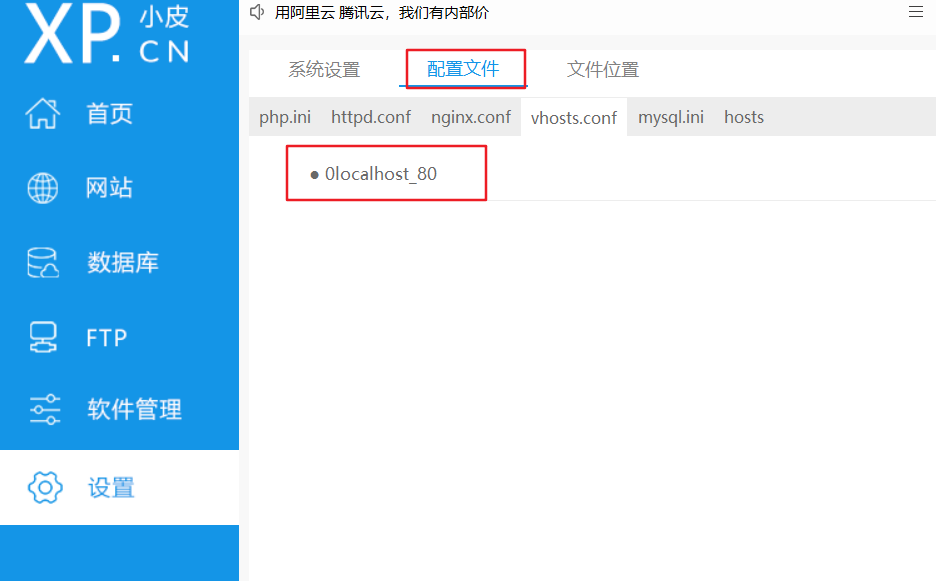
phpstudy设置根目录 一般设为www文件(web服务器上的nginx配置也只会指向这个文件)
其入口是public文件
配置伪静态 访问PHP文件要去掉thinkphp路径中的index.php要配置伪静态
apache伪静态规则
修改apache配置文件httpd.conf
取消掉该行的注释
1 LoadModule rewrite_module modules/mod_rewrite.so
将将 AllowOverride None 修改为: AllowOverride All
以开启
1 2 3 4 5 6 7 <Directory /> Options +Indexes +FollowSymLinks +ExecCGI AllowOverride All Order allow,deny Allow from all Require all granted </Directory >
在thinkphp/public入口文件添加 .htaccess 文件
1 2 3 4 5 6 7 8 9 <IfModule mod_rewrite.c > Options +FollowSymlinks -Multiviews RewriteEngine On RewriteCond %{REQUEST_FILENAME} !-d RewriteCond %{REQUEST_FILENAME} !-f RewriteRule ^(.*)$ index.php/$1 [QSA,PT,L] </IfModule >
在phpstudy的网站设置中添加伪静态设置以对应.htaccess文件
1 2 3 4 5 6 7 8 <IfModule mod_rewrite.c > RewriteEngine On RewriteBase / RewriteRule ^index\.php$ - [L] RewriteCond %{REQUEST_FILENAME} !-f RewriteCond %{REQUEST_FILENAME} !-d RewriteRule . /index.php [L] </IfModule >
Nginx伪静态规则
在thinkphp/public入口文件添加 nginx.htaccess 文件
1 2 3 4 5 6 try_files $uri $uri/ /exploit/index.php?$query_string;if (!-e $request_filename) { rewrite ^(.*)$ /index.php?s=$1 last ; break; }
修改配置文件
在 location中增加if语句最终为
1 2 3 4 5 6 7 8 9 10 11 12 13 14 15 16 17 18 19 20 21 22 location / { index index.php index.html; if (!-e $request_filename) { rewrite ^(.*)$ /index.php?s=/$1 last ; break; } error_page 400 /error/400 .html; error_page 403 /error/403 .html; error_page 404 /error/404 .html; error_page 500 /error/500 .html; error_page 501 /error/501 .html; error_page 502 /error/502 .html; error_page 503 /error/503 .html; error_page 504 /error/504 .html; error_page 505 /error/505 .html; error_page 506 /error/506 .html; error_page 507 /error/507 .html; error_page 509 /error/509 .html; error_page 510 /error/510 .html; include D:/phpstudy_pro/WWW/ktsb/public/nginx.htaccess; autoindex off ; }
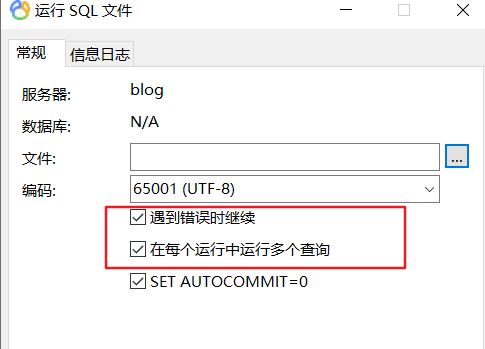
2.数据库导入 navicat执行sql文件错误
可以关闭以上两个选项查看执行错误
数据库严格模式与非严格模式 严格模式下
不支持对not null字段插入null值
不支持对自增长字段插入”值
不支持text字段有默认值
在严格模式下timestamp类型的字段不允许 ‘0000-00-00’ 作为有效日期
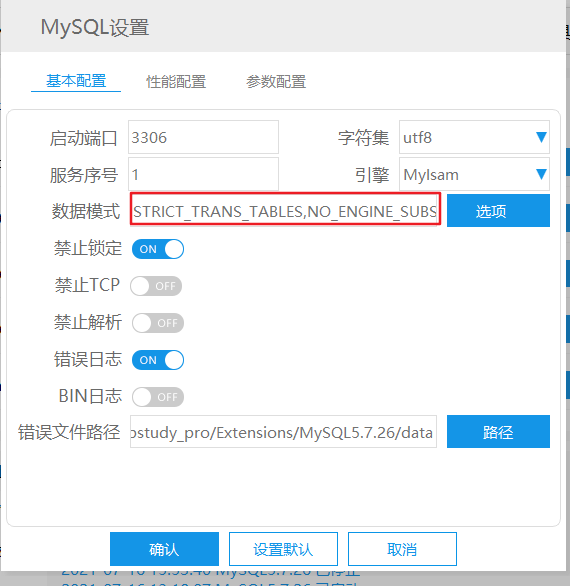
数据库模式修改 运行命令查看模式
1 show variables like 'sql_mode'
显示出模式的项
所以需要移除NO_ZERO_IN_DATE,NO_ZERO_DATE,最终变为
STRICT_TRANS_TABLES,NO_AUTO_CREATE_USER,NO_ENGINE_SUBSTITUTION
可以在root权限下运行命令
1 set global sql_mode = 'ONLY_FULL_GROUP_BY,STRICT_TRANS_TABLES,ERROR_FOR_DIVISION_BY_ZERO,NO_ENGINE_SUBSTITUTION' ;
也可以在phpstudy环境下修改为非严格模式