Netflix OSS已在新版的SpringCloud中移除了,SpringCloud Netflix已经落后版本了🤯,但是不妨通过其掌握微服务的思想,理解SpringCloud的核心思想,核心组件
分布式与集群 (1)微服务概念 微服务简单来说,一个springboot就是一个微服务,不同的是这个springboot只做一项单纯的任务
(2)服务注册 springcloud有个微服务注册中eureka server,通过它把微服务注册起来以供来调用
(3)服务访问 微服务直接可以通过注册中心的定位相互访问
(4)分布式概念 简单说,原来是在一个 springboot里就完成的事情,现在分布在多个 springboot里做,这就是初步具备分布式雏形了
如果我要更新数据微服务,视图微服务是不受影响的
可以让不同的团队开发不同的微服务,他们之间只要约定好接口,彼此之间是低耦合的。
如果视图微服务挂了,数据微服务依然可以继续使用
(5)集群 提供相同功能,只是端口不一样的微服务称为集群
比起一个 springboot, 两个springboot 可以分别部署在两个不同的机器上,那么理论上来说,能够承受的负载就是 x 2. 这样系统就具备通过横向扩展而提高性能的机制
如果 8001 挂了,还有 8002 继续提供微服务,这就叫做高可用
SpringCloud介绍 参考资料:四种软件架构
(1)单体架构
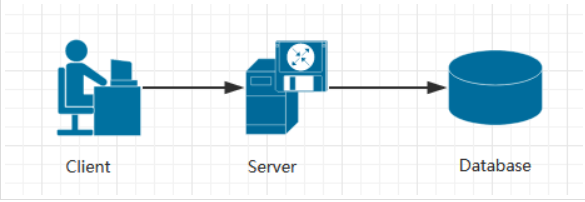
典型的三级架构,前端(Web/手机端)+中间业务逻辑层+数据库层
(2)分布式架构
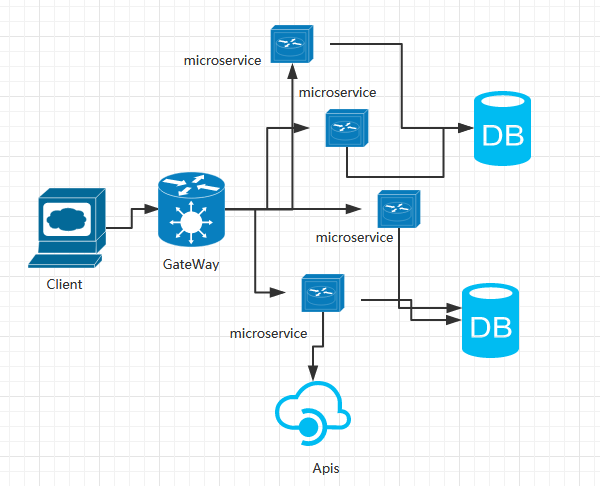
将一个大的系统划分为多个业务模块,业务模块分别部署在不同的服务器上,各个业务模块之间通过接口进行数据交互。数据库也大量采用分布式数据库,通过LVS/Nginx代理应用,将用户请求均衡的负载到不同的服务器上
(3)微服务架构
将系统拆分成很多小应用(微服务),微服务可以部署在不同的服务器上,也可以部署在相同的服务器不同的容器上。当应用的故障不会影响到其他应用,单应用的负载也不会影响到其他应用
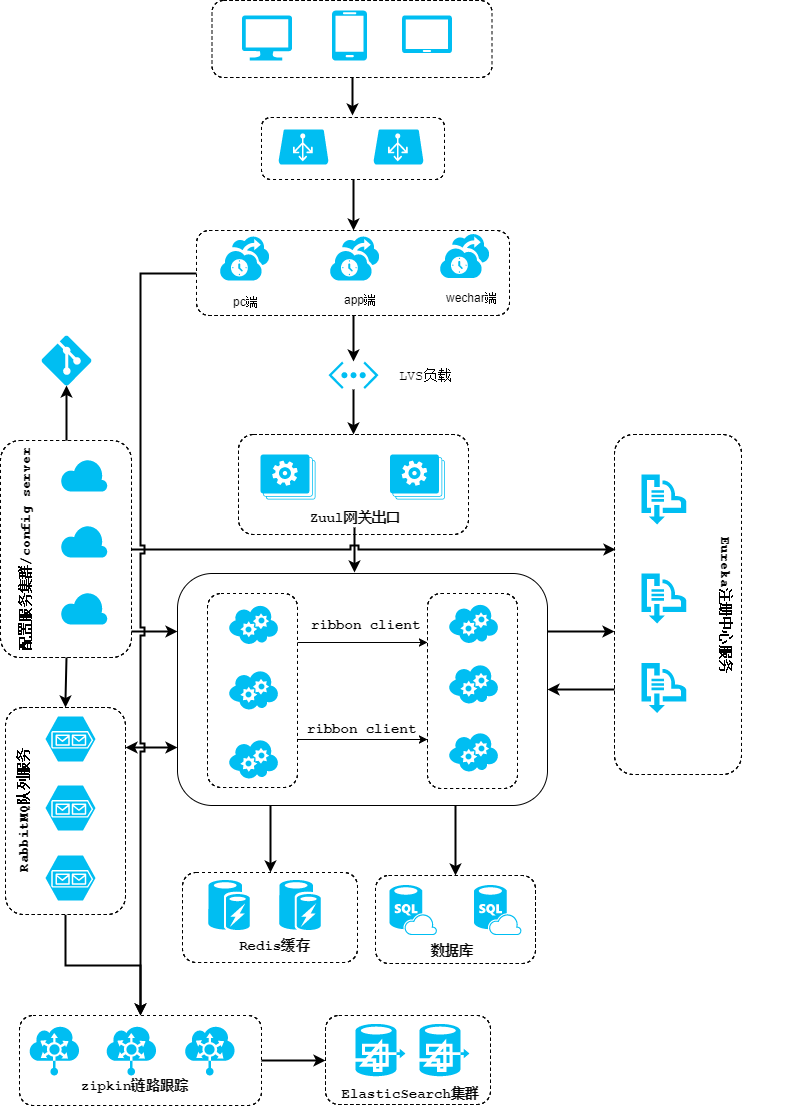
(4)SpringCloud组成 SpringCloud 就是一套工具,帮助我们很容易地搭建出这么一个 集群和分布式的架子出来,Spring Cloud 专注于为典型用例提供良好的开箱即用体验,并为其他用户提供可扩展性机制
Spring Cloud Netflix:cloud各项服务依赖与它,与各种Netflix OSS组件集成,组成微服务的核心,它的主要有组成有Eureka, Hystrix, Zuul
Eureka注册中心服务:SpringCloud服务中心,云端服务发现,一个基于 REST 的服务,用于定位服务,以实现云端中间层服务发现和故障转移
Microservice:微服务,在springcloud可以简单理解为专职做一项任务的springboot,微服务之间可以通过Ribbon和Feign两种方式进行微服务之间的访问(Feign是主流方式)
Zipkin链路跟踪:从属于Spring Cloud Sleuth(日志收集工具包),为SpringCloud应用实现了一种分布式追踪解决方案,可以查看微服务之间的复杂的调用关系
Config Server 配置服务器:俗称配置中心,配置管理工具包,让你可以把配置放到远程服务器(比如集中放在git),集中化管理集群配置
Bus 消息总线:事件、消息总线,用于在集群(例如,配置变化事件)中传播状态变化,可与Config Server 联合,再使用RabbitMQ实现热部署(所谓热部署即不需要重启微服务,对配置信息自动更新)
断路器Hystrix:容错管理工具,旨在通过熔断机制控制服务和第三方库的节点,从而对延迟和故障提供更强大的容错能力,简单来说就是提供异常或错误的处理微服务,比如说某个微服务寄了,断路器就可以调用其他微服务顶上(一般是错误处理的微服务)
Hystrix dashboard 断路器监控:通过turbine将集群中多个实例汇聚在一起,对微服务进行断路器监控
网关Zuul:Zuul 是在云平台上提供动态路由,监控,弹性,安全等边缘服务的框架,通过网关简化了对各个服务的访问:不再需要记录各个微服务的地址和端口,而是通过网关去访问他们
Springcloud 启动测试 (1)项目启动
启动RabbitMQ(访问http://127.0.0.1:15672/# 即已开启)
启动链路追踪服务器(这里开启的端口要与微服务中的配置一致)
1 java -jar zipkin-server-2.10.1-exec.jar --server.port=8050 --zipkin.collector.rabbitmq.addresses=localhost
访问配置仓库https://github.com/Autovy/SpringCloudConfig/ (也可以在config-server模块的配置文件修改成自己的仓库)
运行EurekaServerApplication,启动注册中心服务(端口为8761)
运行ConfigServerApplication,启动配置服务器(端口为8030)
运行ProductDataServiceApplication,启动数据微服务(端口填写8001,8002形成集群)
运行ProductViewServiceFeignApplication,启动视图微服务(端口可填写8012,8013)
运行ProductServiceHystrixDashboardApplication,开启断路器监控,监控单个微服务(端口为8020)
运行ProductServiceTurbineApplication,开启聚合断路器监控以监控集群(端口为8021)
运行视图微服务里的 AccessViewService 来周期性地访问 http://127.0.0.1:8012/products 和 http://127.0.0.1:8013/products,以提供监控数据
运行ProductServiceZuulApplication,开启网关服务(端口为8060)
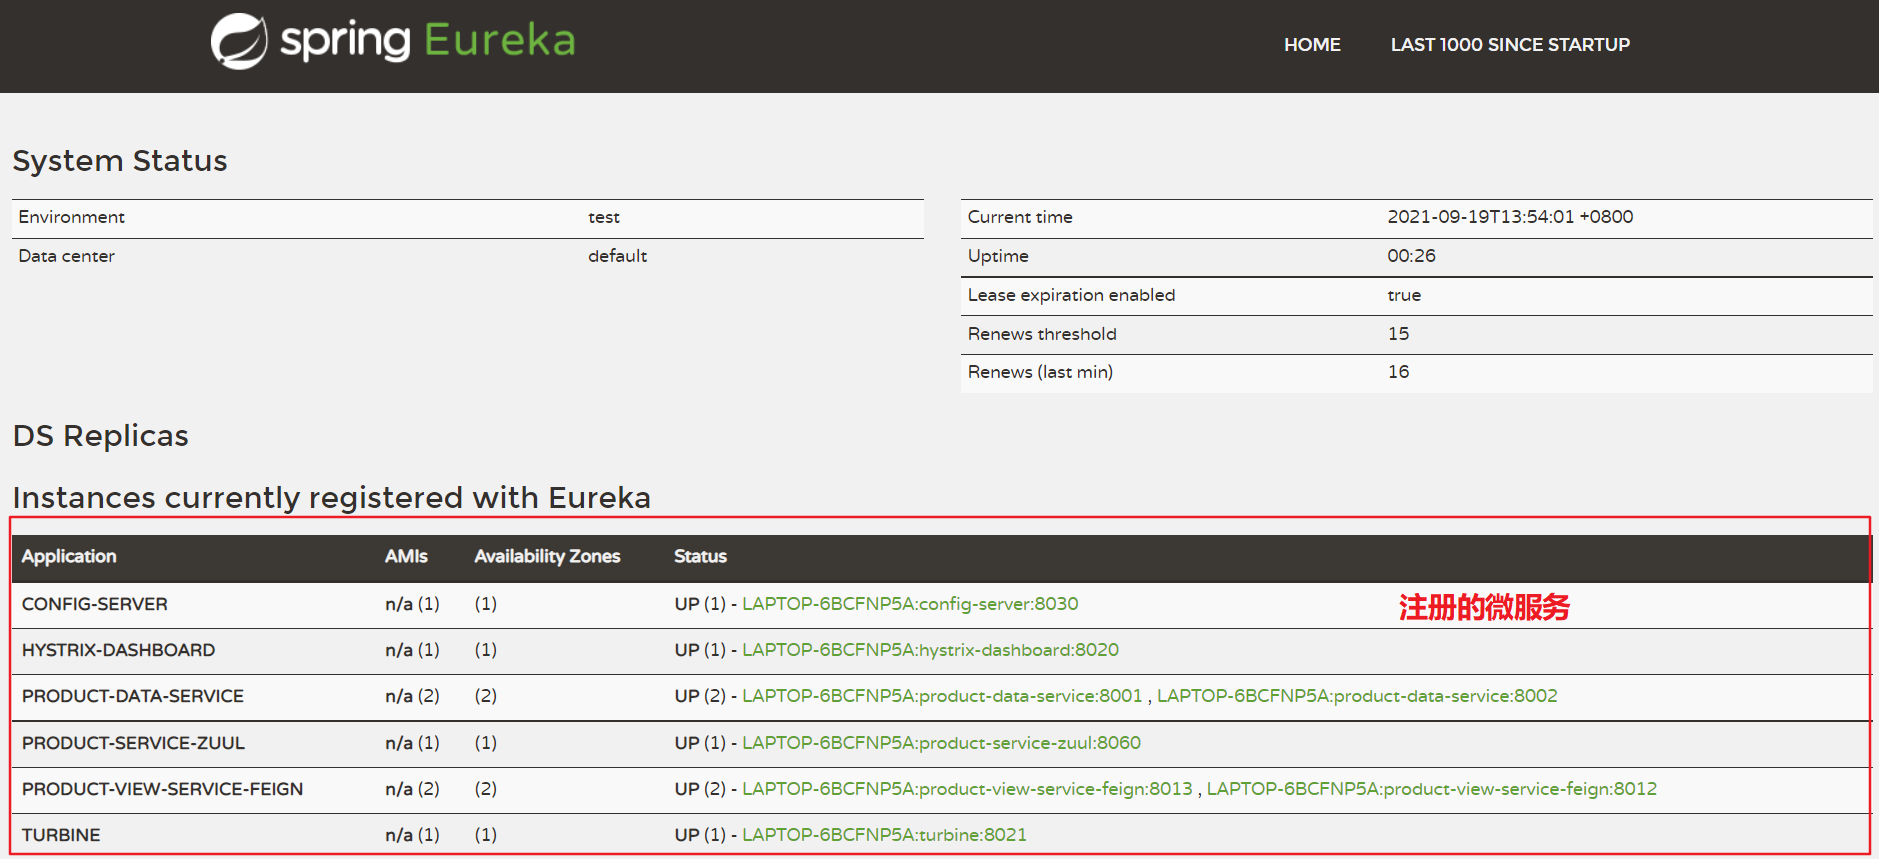
(2)测试服务注册中心 打开链接http://127.0.0.1:8761/ ,即可查看到注册服务中心Eureka
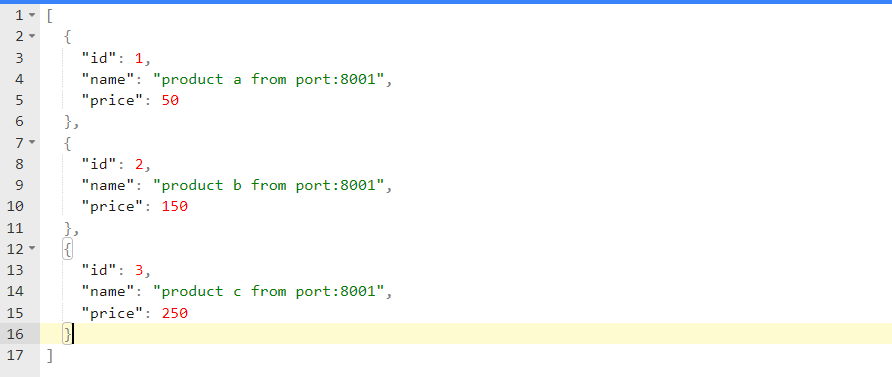
(3)测试数据微服务 打开链接http://127.0.0.1:8001/products 和 http://127.0.0.1:8002/products 都可以访问到返回的数据
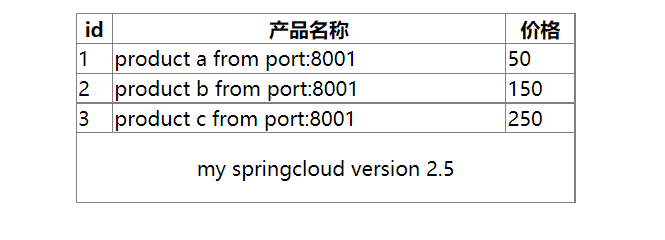
(4)测试视图微服务 打开链接http://127.0.0.1:8012/products 和 http://127.0.0.1:8013/products 可以访问到视图页面,并且可以发现视图微服务会随机选择端口访问数据微服务实现负载均衡
(5)测试服务链路追踪 打开链接http://127.0.0.1:8050/zipkin/dependency/ 即可访问到
Zipkin链路跟踪服务页面,即可看到微服务间的访问关系
(6)测试Bus消息总线 可访问http://127.0.0.1:8030/version/dev 查看到配置服务器的信息
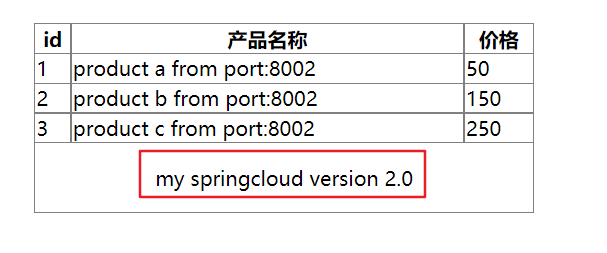
访问视图查看当前版本号
修改配置服务器git上的版本号,这里我的仓库地址为https://github.com/Autovy/SpringCloudConfig/
启动视图微服务中的FreshConfigUtil使用 post 的方式访问 http://localhost:8012/actuator/bus-refresh 地址,更新配置信息
最后再查看视图上的更新
可以访问RabbitMQ页面:http://127.0.0.1:15672/ ,查看队列,连接,还有交换机
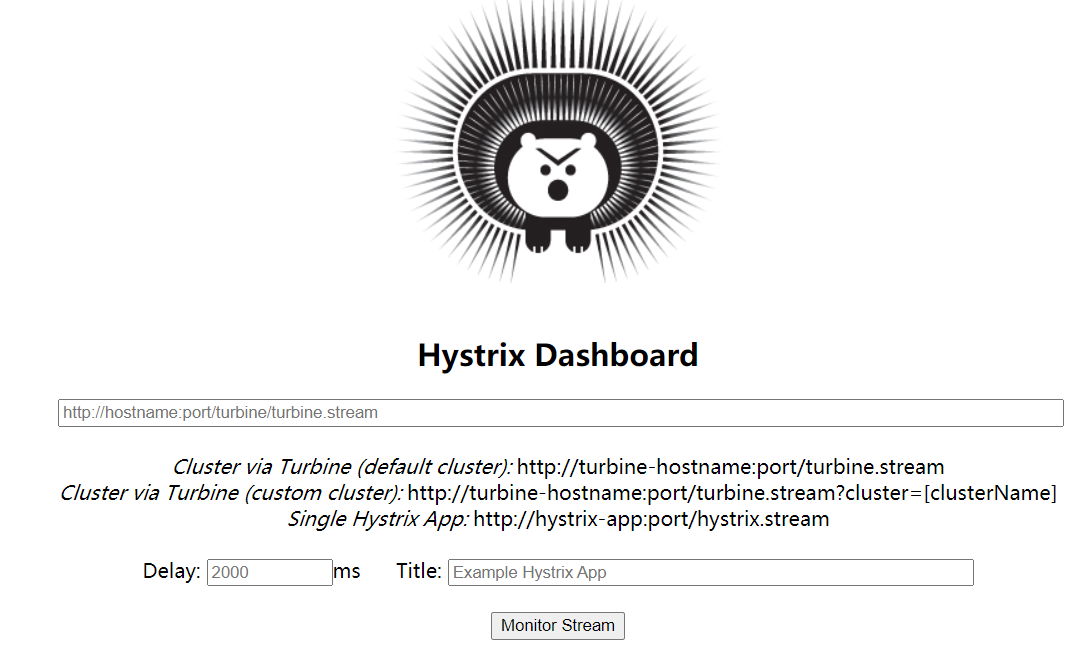
(7)测试Hystrix断路器及其监控 打开链接http://localhost:8020/hystrix 即可进入Hystrix断路器的监控入口
框内输入http://localhost:8012/actuator/hystrix.stream 即可对8012端口的视图微服务进行监控
框内输入http://localhost:8021/turbine.stream 即可实现对整个集群的视图微服务进行监控
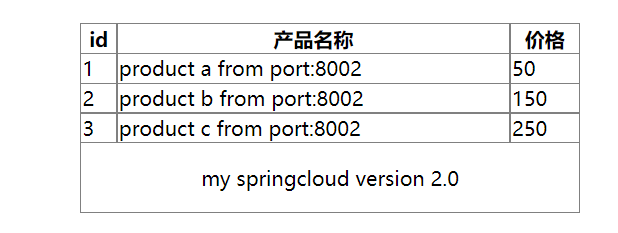
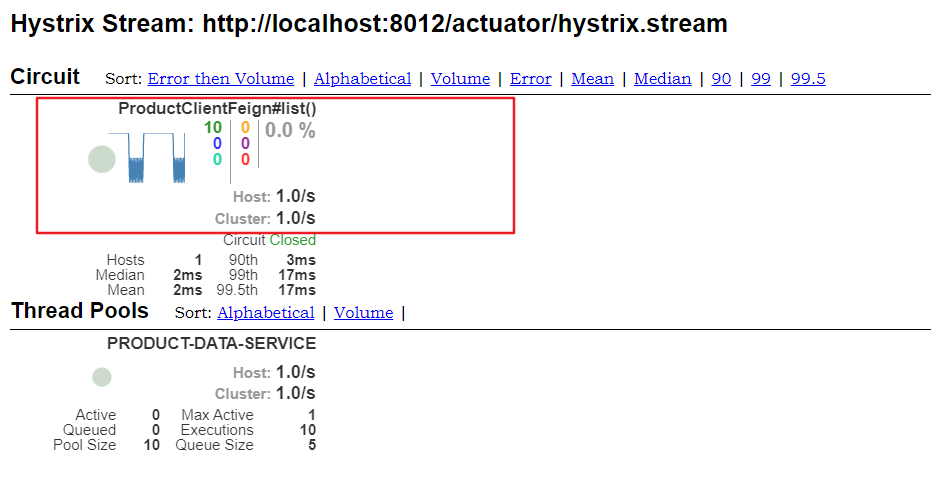
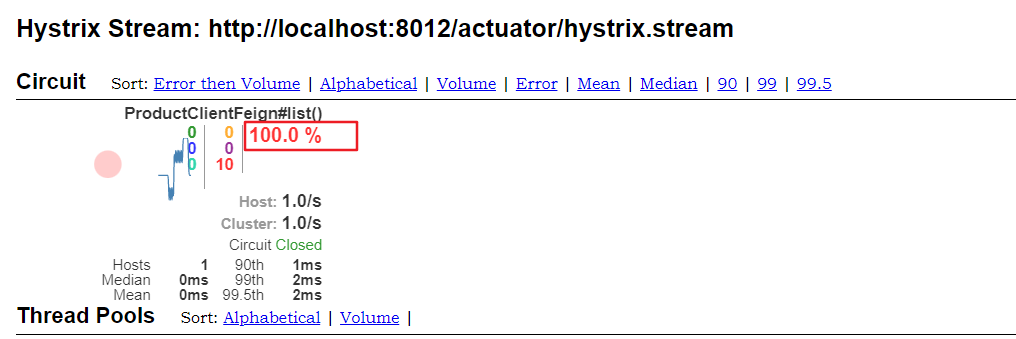
停止数据微服务 ProductDataServiceApplication集群,触发断路器:
访问视图可得
访问单个微服务监控页面可得
访问聚合集群微服务监控页面可得
(8)网关测试 可以在zuul的配置文件中修改微服务的访问路由,我绑定的路由如下:
http://localhost:8060/api-data/products :访问数据微服务集群
http://localhost:8060/api-view/products :访问视图微服务集群
可以发现其访问集群的端口也是负载均衡的
服务注册中心 (1)需求 通过服务注册中心管理微服务,并且让微服务直接可以相互定位交流
(2)相关依赖 1 2 3 4 5 6 7 <dependencies > <dependency > <groupId > org.springframework.cloud</groupId > <artifactId > spring-cloud-starter-netflix-eureka-server</artifactId > </dependency > </dependencies >
(3)相关配置 1 2 3 4 5 6 7 8 9 10 11 12 13 14 15 eureka: instance: hostname: localhost client: register-with-eureka: false fetch-registry: false serviceUrl: defaultZone: http://${eureka.instance.hostname}:${server.port}/eureka/ spring: application: name: eureka-server
hostname: localhost 表示主机名称
registerWithEureka:false 表示是否注册到服务器。 因为它本身就是服务器,所以就无需把自己注册到服务器
fetchRegistry: false 表示是否获取服务器的注册信息,和上面同理,这里也设置为 false
defaultZone: http://${eureka.instance.hostname}:${server.port}/eureka/ 自己作为服务器,公布出来的地址。 比如后续某个微服务要把自己注册到 eureka server, 那么就要使用这个地址: http://localhost:8761/eureka/
(4)服务启动 1 2 3 4 5 6 7 8 9 10 11 12 13 14 15 16 @SpringBootApplication @EnableEurekaServer public class EurekaServerApplication public static void main (String[] args) int port = 8761 ; new SpringApplicationBuilder(EurekaServerApplication.class) .properties("server.port=" + port) .run(args); } }
配置服务器 (1)需求 微服务要做集群,这就意味着,会有多个微服务实例。 在业务上有时候需要修改一些配置信息,比如说 版本信息,倘若没有配置服务, 那么就需要挨个修改微服务,挨个重新部署微服务,这样就比较麻烦。
我们可以把这些配置信息放在一个公共的地方,比如git,然后通过配置服务器把它获取下来,然后微服务再从配置服务器上取下来
(2)git准备 在github上新建仓库,并创建respo目录,在目录下添加 product-view-service-feign-dev.properties文件并写入版本信息
如我创建的仓库:https://github.com/Autovy/SpringCloudConfig
(3)相关依赖 1 2 3 4 5 6 7 8 9 10 11 12 13 14 15 16 17 18 <dependencies > <dependency > <groupId > org.springframework.cloud</groupId > <artifactId > spring-cloud-starter-netflix-eureka-client</artifactId > </dependency > <dependency > <groupId > org.springframework.boot</groupId > <artifactId > spring-boot-starter-web</artifactId > </dependency > <dependency > <groupId > org.springframework.cloud</groupId > <artifactId > spring-cloud-config-server</artifactId > </dependency > </dependencies >
(4)相关配置 1 2 3 4 5 6 7 8 9 10 11 12 13 14 15 16 17 18 19 spring: application: name: config-server cloud: config: label: master server: git: uri: https://github.com/Autovy/SpringCloudConfig/ search-paths: respo default-label: main eureka: client: serviceUrl: defaultZone: http://localhost:8761/eureka/
(5)服务启动 1 2 3 4 5 6 7 8 9 10 11 12 13 14 15 @SpringBootApplication @EnableEurekaClient @EnableDiscoveryClient @EnableConfigServer public class ConfigServerApplication public static void main (String[] args) int port = 8030 ; new SpringApplicationBuilder(ConfigServerApplication.class) .properties("server.port=" +port) .run(args); } }
RabbitMQ (1) RabbitMQ的介绍 通过RabbitMQ与消息总线Bus实现配置服务器热部署即自动更新配置信息
RabbitMQ 是一个由 Erlang 语言开发的 AMQP 的开源实现。
AMQP(Advanced Message Queuing Protocol),顾名思义,它是一个消息协议,能够使得遵循该协议的客户端和消息中间件(Broker)进行通讯
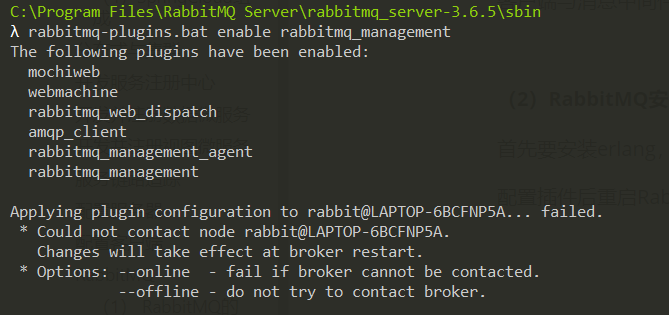
(2)RabbitMQ安装 首先要安装erlang,并配置环境,才继续安装RabbitMQ
配置插件后重启RabbitMQ
(3)RabbitMQ页面无法访问问题 一般来说开启了RabbitMQ服务后,可以通过链接http://127.0.0.1:15672/进行访问
如果页面无法访问到,可以自行下列语句重新生成相关配置文件
1 net stop rabbitmq && rabbitmq-server -detached && net start rabbitmq
这样即可访问到RabbitMQ的页面(用户与密码默认为guest/guest)
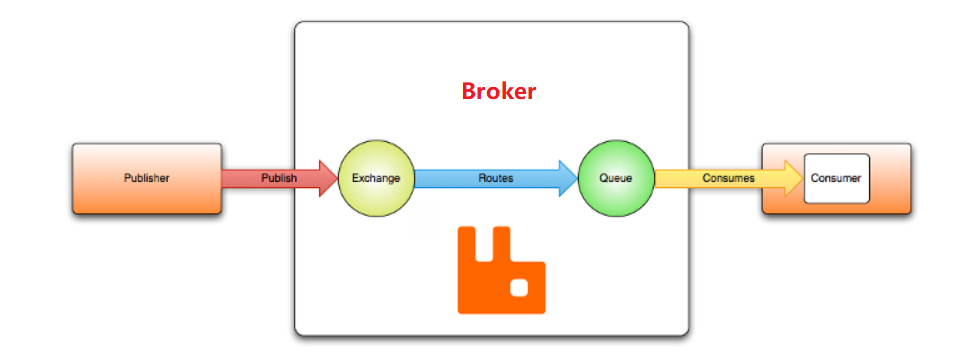
(4)消息路由过程
消息(message)发布给交换机(Exchange)
Exchange相当于邮局或者信箱,它接收到消息后会根据不同的规则(称为Bindings)来确定要发给哪个队列(queue)
最后AMQP代理会将消息投递给订阅了此队列的消费者,或者是消费者依据需求自行获取
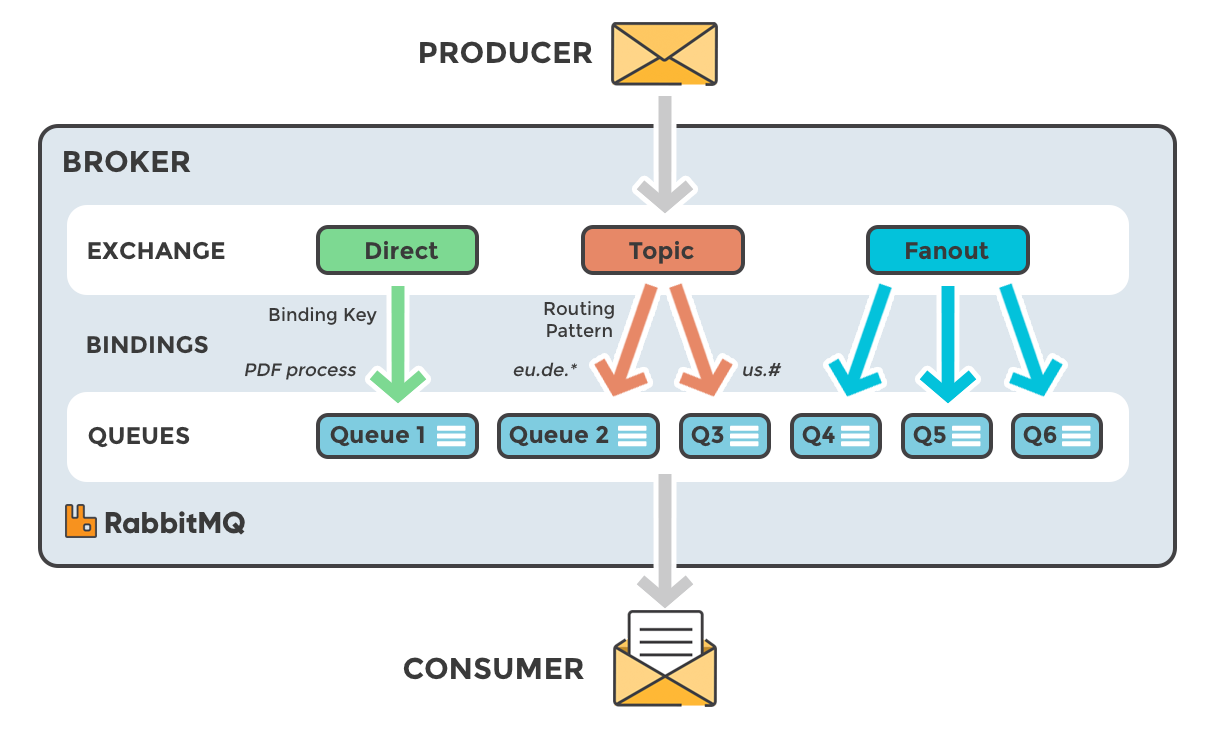
(5)模式分类 RabbitMQ提供了四种Exchange模式:fanout,direct,topic,header 。header在实际使用中很少用到,故我们只介绍前面三种
Direct 模式就是指定队列模式, 消息来了,只发给指定的 Queue, 其他Queue 都收不到
Topic 模式就是主题模式,Queue 按照某种主题分类接收消息
Fanout 模式就是广播模式,消息来了,会发给所有的队列
在本项目中,我们让config-server去git获取最新配置信息,并将该信息广播给集群中的所有视图微服务
断路器监控 (1)需求 前面我们了解了断路器, 当数据服务不可用的时候, 断路器就会发挥作用
而我们可以使用断路器监控来可视化断路器运行情况
(2)相关依赖 1 2 3 4 5 6 7 8 9 10 11 12 13 14 15 16 17 18 19 20 21 22 23 24 25 26 27 28 29 30 31 <dependencies > <dependency > <groupId > org.springframework.cloud</groupId > <artifactId > spring-cloud-starter-netflix-eureka-client</artifactId > </dependency > <dependency > <groupId > org.springframework.boot</groupId > <artifactId > spring-boot-starter-web</artifactId > </dependency > <dependency > <groupId > org.springframework.boot</groupId > <artifactId > spring-boot-starter-actuator</artifactId > </dependency > <dependency > <groupId > org.springframework.cloud</groupId > <artifactId > spring-cloud-starter-netflix-hystrix</artifactId > </dependency > <dependency > <groupId > org.springframework.cloud</groupId > <artifactId > spring-cloud-starter-netflix-hystrix-dashboard</artifactId > </dependency > </dependencies >
(3)相关配置 1 2 3 4 spring: application: name: hystrix-dashboard
(4)服务启动 1 2 3 4 5 6 7 8 9 10 11 12 13 14 15 16 17 18 19 20 @SpringBootApplication @EnableHystrixDashboard public class ProductServiceHystrixDashboardApplication public static void main (String[] args) int port = 8020 ; if (!NetUtil.isUsableLocalPort(port)) { System.err.printf("端口%d被占用了,无法启动%n" , port ); System.exit(1 ); } new SpringApplicationBuilder(ProductServiceHystrixDashboardApplication.class) .properties("server.port=" + port) .run(args); } }
断路器聚合监控 (1)需求 上面的内容只能针对一个微服务进行断路器监控,但是一个微服务通常由多个实例组成,监控起来十分不方便;springcloud提供了turbine可以把一个集群里的多个实例汇聚在一个turbine里,这样就能够在集群层面进行监控了
(2)相关依赖 1 2 3 4 5 6 7 8 9 10 11 12 13 14 15 16 17 18 19 20 21 22 23 24 25 26 27 28 29 30 31 32 33 34 35 36 37 38 <dependencies > <dependency > <groupId > org.springframework.cloud</groupId > <artifactId > spring-cloud-starter-netflix-eureka-client</artifactId > </dependency > <dependency > <groupId > org.springframework.boot</groupId > <artifactId > spring-boot-starter-web</artifactId > </dependency > <dependency > <groupId > org.springframework.boot</groupId > <artifactId > spring-boot-starter-actuator</artifactId > </dependency > <dependency > <groupId > org.springframework.cloud</groupId > <artifactId > spring-cloud-starter-netflix-hystrix</artifactId > </dependency > <dependency > <groupId > org.springframework.cloud</groupId > <artifactId > spring-cloud-starter-netflix-hystrix-dashboard</artifactId > </dependency > <dependency > <groupId > org.springframework.cloud</groupId > <artifactId > spring-cloud-starter-netflix-turbine</artifactId > </dependency > </dependencies >
(3)相关配置 1 2 3 4 5 6 7 8 9 10 11 12 13 14 15 16 17 18 19 spring: application: name: turbine turbine: aggregator: cluster-config: default app-config: product-view-service-feign cluster-name-expression: new String("default") eureka: client: serviceUrl: defaultZone: http://localhost:8761/eureka/
(4)服务启动 1 2 3 4 5 6 7 8 9 10 11 12 13 14 15 16 17 18 19 20 21 22 @SpringBootApplication @EnableTurbine public class ProductServiceTurbineApplication public static void main (String[] args) int port = 8021 ; if (!NetUtil.isUsableLocalPort(port)){ System.err.printf("端口%d被占用,无法启动%n" , port); System.exit(1 ); } new SpringApplicationBuilder(ProductServiceTurbineApplication.class) .properties("server.port=" + port) .run(args); } }
网关Zuul (1)需求 微服务有可能放在不同的 ip 地址上,有可能是不同的端口
为了访问他们,就需要记录这些地址和端口。 而地址和端口都可能会变化,这就增加了访问者的负担
这时候我们就可以通过网关简化对微服务的访问,仅需要一个地址一个端口就可以实现对一个微服务集群的访问
(2)相关依赖 1 2 3 4 5 6 7 8 9 10 11 12 13 14 15 16 17 <dependencies > <dependency > <groupId > org.springframework.cloud</groupId > <artifactId > spring-cloud-starter-netflix-eureka-client</artifactId > </dependency > <dependency > <groupId > org.springframework.boot</groupId > <artifactId > spring-boot-starter-web</artifactId > </dependency > <dependency > <groupId > org.springframework.cloud</groupId > <artifactId > spring-cloud-starter-netflix-zuul</artifactId > </dependency > </dependencies >
(3)相关配置 1 2 3 4 5 6 7 8 9 10 11 12 13 14 15 16 17 18 19 20 spring: application: name: product-service-zuul eureka: client: serviceUrl: defaultZone: http://localhost:8761/eureka/ zuul: routes: api-a: path: /api-data/** serviceId: PRODUCT-DATA-SERVICE api-b: path: /api-view/** serviceId: PRODUCT-VIEW-SERVICE-FEIGN
(4)服务启动 1 2 3 4 5 6 7 8 9 10 11 12 13 14 15 16 17 18 19 20 21 22 23 @SpringBootApplication @EnableZuulProxy @EnableEurekaClient @EnableDiscoveryClient public class ProductServiceZuulApplication public static void main (String[] args) int port = 8060 ; if (!NetUtil.isUsableLocalPort(port)){ System.err.printf("端口%d被占用了,无法启动%d" , port); System.exit(1 ); } new SpringApplicationBuilder(ProductServiceZuulApplication.class) .properties("server.port=" + port) .run(args); } }
数据微服务 (1)需求 访问数据库为视图微服务提供数据(在本项目中为了配置方便,不设dao层直接在service层提供假数据),真正意义上完整的springboot
(2)相关依赖 1 2 3 4 5 6 7 8 9 10 11 12 13 14 15 16 17 18 <dependencies > <dependency > <groupId > org.springframework.cloud</groupId > <artifactId > spring-cloud-starter-netflix-eureka-client</artifactId > </dependency > <dependency > <groupId > org.springframework.boot</groupId > <artifactId > spring-boot-starter-web</artifactId > </dependency > <dependency > <groupId > org.springframework.cloud</groupId > <artifactId > spring-cloud-starter-zipkin</artifactId > </dependency > </dependencies >
(3)相关配置 1 2 3 4 5 6 7 8 9 10 11 12 spring: application: name: product-data-service zipkin: base-url: http://localhost:8050 eureka: client: serviceUrl: defaultZone: http://localhost:8761/eureka/
(4)实体类 1 2 3 4 5 6 7 8 9 10 11 12 13 14 15 16 17 18 19 20 21 22 23 24 25 26 27 28 29 30 31 32 33 34 35 36 37 38 39 40 public class Product private int id; private String name; private int price; public int getId () return id; } public void setId (int id) this .id = id; } public String getName () return name; } public void setName (String name) this .name = name; } public int getPrice () return price; } public void setPrice (int price) this .price = price; } public Product () } public Product (int id, String name, int price) super (); this .id = id; this .name = name; this .price = price; } }
(5)服务层 不接入dao层,直接在服务层提供假数据
1 2 3 4 5 6 7 8 9 10 11 12 13 14 15 16 17 18 19 @Service public class ProductService @Value("${server.port}") String port; public List<Product> list () List<Product> ps = new ArrayList<>(); ps.add(new Product(1 ,"product a from port:" +port, 50 )); ps.add(new Product(2 ,"product b from port:" +port, 150 )); ps.add(new Product(3 ,"product c from port:" +port, 250 )); return ps; } }
(6)控制层 接入服务层并映射路径
1 2 3 4 5 6 7 8 9 10 11 12 13 14 15 @RestController public class ProductController @Autowired ProductService productService; @RequestMapping("/products") public Object products () List<Product> ps = productService.list(); return ps; } }
(7)服务启动 1 2 3 4 5 6 7 8 9 10 11 12 13 14 15 16 17 18 19 20 21 22 23 24 25 26 27 28 @SpringBootApplication @EnableEurekaClient public class ProductDataServiceApplication public static void main (String[] args) int port = 0 ; System.out.println("请输入开启服务的端口号:" ); Scanner strpost = new Scanner(System.in); port = strpost.nextInt(); new SpringApplicationBuilder(ProductDataServiceApplication.class) .properties("server.port=" + port) .run(args); } @Bean public Sampler defaultSampler () return Sampler.ALWAYS_SAMPLE; } }
视图微服务 (1)需求 访问数据微服务(这里主要用feign的方式),将数据发送到视图层展示
(2)相关依赖 1 2 3 4 5 6 7 8 9 10 11 12 13 14 15 16 17 18 19 20 21 22 23 24 25 26 27 28 29 30 31 32 33 34 35 36 37 38 39 40 41 42 43 44 45 46 47 48 49 50 51 52 53 54 <dependencies > <dependency > <groupId > org.springframework.cloud</groupId > <artifactId > spring-cloud-starter-netflix-eureka-client</artifactId > </dependency > <dependency > <groupId > org.springframework.cloud</groupId > <artifactId > spring-cloud-starter-openfeign</artifactId > </dependency > <dependency > <groupId > org.springframework.boot</groupId > <artifactId > spring-boot-starter-web</artifactId > </dependency > <dependency > <groupId > org.springframework.boot</groupId > <artifactId > spring-boot-starter-thymeleaf</artifactId > </dependency > <dependency > <groupId > org.springframework.cloud</groupId > <artifactId > spring-cloud-starter-zipkin</artifactId > </dependency > <dependency > <groupId > org.springframework.cloud</groupId > <artifactId > spring-cloud-starter-config</artifactId > </dependency > <dependency > <groupId > org.springframework.boot</groupId > <artifactId > spring-boot-starter-actuator</artifactId > </dependency > <dependency > <groupId > org.springframework.cloud</groupId > <artifactId > spring-cloud-starter-bus-amqp</artifactId > </dependency > <dependency > <groupId > org.springframework.cloud</groupId > <artifactId > spring-cloud-starter-netflix-hystrix</artifactId > </dependency > </dependencies >
(3)相关配置 这里的微服务由于要通过rabbitMQ访问到配置服务器,需要系统层面上的配置,故需要两个配置文件:bootstrap.yml 和 application.yml
参考资料:application.yml与bootstrap.yml的区别
bootstrap.yml 和 application.yml 都可以用来配置参数
bootstrap.yml 用来程序引导时执行,应用于更加早期配置信息读取。可以理解成系统级别的一些参数配置,这些参数一般是不会变动的。一旦bootStrap.yml 被加载,则内容不会被覆盖
application.yml 可以用来定义应用级别的, 应用程序特有配置信息,可以用来配置后续各个模块中需使用的公共参数等
bootstrap.yml文件
主要提供了 serviceId: config-server, 这个是配置服务器在 eureka server 里的服务名称,这样就可以定位 config-server了
在注册服务中心的注册也移到了bootstrap.yml
1 2 3 4 5 6 7 8 9 10 11 12 13 14 15 16 17 18 19 20 21 22 23 24 25 26 27 spring : cloud: config: label: main profile: dev discovery: enabled: true service-id: config-server bus: enable: true trace: enabled: true rabbitmq: host: localhost port: 5672 username: guest password: guest eureka: client: serviceUrl: defaultZone: http://localhost:8761/eureka/
application.yml文件
1 2 3 4 5 6 7 8 9 10 11 12 13 14 15 16 17 18 19 20 21 22 23 24 25 26 27 28 29 30 31 32 spring: application: name: product-view-service-feign zipkin: base-url: http://localhost:8050 thymeleaf: cache: false prefix: classpath:/templates/ suffix: .html encoding: UTF-8 servlet: content-type: text/html mode: HTML5 feign.hystrix.enabled: true management: endpoints: web: exposure: include: "*" cors: allowed-origins: "*" allowed-methods: "*"
(4)实体类 与数据微服务的一致
1 2 3 4 5 6 7 8 9 10 11 12 13 14 15 16 17 18 19 20 21 22 23 24 25 26 27 28 29 30 31 32 33 34 35 36 37 public class Product private int id; private String name; private int price; public int getId () return id; } public void setId (int id) this .id = id; } public String getName () return name; } public void setName (String name) this .name = name; } public int getPrice () return price; } public void setPrice (int price) this .price = price; } public Product () } public Product (int id, String name, int price) super (); this .id = id; this .name = name; this .price = price; } }
(5)客户端 视图微服务作为客户端去访问数据微服务这个服务端,并利用断路器提供访问失败后的异常处理信息
Feign客户端
1 2 3 4 5 6 7 8 9 @FeignClient(value = "PRODUCT-DATA-SERVICE", fallback = ProductClientFeignHystrix.class) public interface ProductClientFeign @GetMapping("products") public List<Product> list () }
Hystrix断路器处理
1 2 3 4 5 6 7 8 9 10 11 @Component public class ProductClientFeignHystrix implements ProductClientFeign public List<Product> list () List<Product> res = new ArrayList<>(); res.add(new Product(0 , "产品数据微服务不可用" , 0 )); return res; } }
(6)服务层 接入客户端,自动装配客户端请求到的数据
1 2 3 4 5 6 7 8 9 10 11 12 13 @Service public class ProductService @Autowired ProductClientFeign productClientFeign; public List<Product> list () return productClientFeign.list(); } }
(7)控制层 接入服务层,映射访问路径,发送数据到视图层并输出视图
1 2 3 4 5 6 7 8 9 10 11 12 13 14 15 16 17 18 19 20 21 22 23 24 25 26 @Controller @RefreshScope public class ProductController @Autowired ProductService productService; @Value("${version}") String version; @RequestMapping("/products") public Object products (Model m) List<Product> ps = productService.list(); m.addAttribute("version" , version); m.addAttribute("ps" , ps); return "products" ; } }
(8)视图层 使用thymeleaf可接入java动态化数据
1 2 3 4 5 6 7 8 9 10 11 12 13 14 15 16 17 18 19 20 21 22 23 24 25 26 27 28 29 30 31 32 33 34 35 36 37 38 39 40 41 42 43 44 45 46 47 <!DOCTYPE HTML > <html xmlns:th ="http://www.thymeleaf.org" > <head > <title > products</title > <meta http-equiv ="Content-Type" content ="text/html; charset=UTF-8" /> <style > table { border-collapse :collapse; width :400px ; margin :20px auto; } td ,th { border :1px solid gray; } </style > </head > <body > <div class ="workingArea" > <table > <thead > <tr > <th > id</th > <th > 产品名称</th > <th > 价格</th > </tr > </thead > <tbody > <tr th:each ="p: ${ps}" > <td th:text ="${p.id}" > </td > <td th:text ="${p.name}" > </td > <td th:text ="${p.price}" > </td > </tr > <tr > <td align ="center" colspan ="3" > <p th:text ="${version}" > how2j springcloud version unknown</p > </td > </tr > </tbody > </table > </div > </body > </html >
(9)网络访问 更新配置信息
使用 post 的方式访问配置服务器的 http://localhost:8012/actuator/bus-refresh 地址,用于更新配置信息
1 2 3 4 5 6 7 8 9 10 11 12 13 14 15 16 17 18 19 20 21 22 23 public class FreshConfigUntil public static void main (String[] args) HashMap<String, String> headers = new HashMap<>(); headers.put("Content-Type" , "application/json; charset=utf-8" ); System.out.println("请耐心等待" ); String result = HttpUtil.createPost("http://localhost:8012/actuator/bus-refresh" ) .addHeaders(headers).execute().body(); System.out.println("result" + result); System.out.println("refresh 完成" ); } }
提供监控数据
不断对视图层进行访问,以提供断路器监控的数据
1 2 3 4 5 6 7 8 9 10 11 12 13 14 15 16 17 18 19 20 21 22 23 24 25 26 27 28 29 30 31 public class AccessViewService public static void main (String[] args) while (true ){ ThreadUtil.sleep(1000 ); access(8012 ); access(8013 ); } } public static void access (int port) try { String html = HttpUtil.get(String.format("http://127.0.0.1:%d/products" , port)); System.out.println("html length:" + html.length()); } catch (Exception e){ System.out.printf("%d地址的视图服务无法访问%n" , port); } } }
(10)服务启动 1 2 3 4 5 6 7 8 9 10 11 12 13 14 15 16 17 18 19 20 21 22 23 24 25 26 27 28 29 30 31 32 33 34 35 36 @SpringBootApplication @EnableEurekaClient @EnableDiscoveryClient @EnableFeignClients @EnableCircuitBreaker public class ProductViewServiceFeignApplication public static void main (String[] args) int rabbitMQPort = 5672 ; if (NetUtil.isUsableLocalPort(rabbitMQPort)){ System.err.printf("未在端口%d发现rabbitMQ服务,请检查" , rabbitMQPort); System.exit(1 ); } int port = 0 ; System.out.println("请输入开启服务的端口号:" ); Scanner strpost = new Scanner(System.in); port = strpost.nextInt(); new SpringApplicationBuilder(ProductViewServiceFeignApplication.class) .properties("server.port=" + port) .run(args); } @Bean public Sampler defaultSampler () return Sampler.ALWAYS_SAMPLE; } }
MPLE;
}

